Version Control with Git/GitHub
Learning Goals
- Define Version Control and its benefit
- Build a mental model of branching workflow
- Practice committing and branching on a solo repository
Warm Up
In a notebook, reflect on the following:
- When doing something like writing an essay, or research paper, how have you saved your work?
- For school projects, what tools have you used to collaborate on a presentation or paper?
- What do you already know about git and GitHub?
Why Git?
When we work on long projects (something that takes more than a few hours - writing a book, tracking a budget, or coding an application), we need to often:
- save progress
- edit old work
- share our work with others
You may be familiar with doing all of these things with tools like Google Docs, Excel, or Word. All of these programs allow you to save, edit and share work. But, they each can only manage their own files - with one command you can only save or share one at a time.
Today, we are going to introduce a new tool for managing how we save, edit, and share our work.
Let’s say you have a project on your computer that has the following file structure:
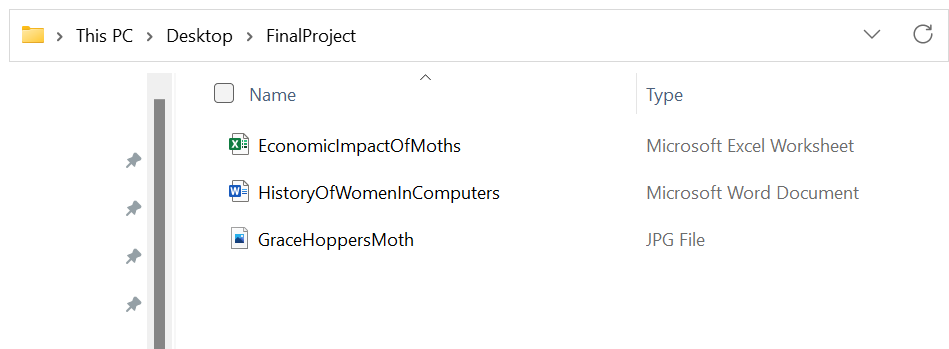
We can make changes to, and save each of these files individually. But, it would be useful if we could group certain changes to all files together, so that we could save changes to the project as a whole. For example, if I were a teacher reviewing this student’s final project, I would want to know that the student added supporting materials when they added a section specific to Grace Hopper - I would want to see that these changes are related.
Git allows for the scenario described above! Git is a program that allows us to group different files into one project, called a repository. Once we add git to a project, we can make changes to many different files, and save those changes with one command. Also, we can add a comment to the project each time we save the whole project so we can give more information about why a change was made.
Version Control
This process of managing changes on a project as a whole is called Version Control. Git is a Version Control System or VCS - there are multiple VCS programs available, but Git is the most widely used in software development.
At its most basic, a project’s version control history might look like this:

In this workflow, we are starting a project, and creating save-points along the way. These save-points are called commits and each commit is a snapshot of what the project looks like at that moment. We could go back (revert) to any of these commits to see previous versions of the project. We can also see a history of the project’s progression through the messages left in the commits - like Add User Registration. In this way, we are creating a more detailed history of the project than just saving files.
Git
The best way to learn how to use Git Version Control is to dive right in - so that’s what we are going to do!
Installing Git
Before we start creating our own git repositories, we will need to download git. Follow these steps to download and configure git before moving on!
Creating a git repository
Individually, take 20 minutes to follow along with the 3 vidoes below; pause as needed and complete each step outlined. After completing the steps, you will have completed a git workflow similar to the diagram above.
About SAVE
Most text editing software will try to enforce file-specific saving; this is meant to help save you from losing your work.  Many developers choose to suppress these 'save' warnings by turning on 'AutoSave' in their IDE.
After you have completed the individual work above:
In small groups: discuss the process that you just completed. As a starter, answer the following questions:
- What is the difference between saving and commiting?
- How do you know what changes were made in an individual commit?
Branching
One of the benefits of using Git, is the ability to create branches. A branch is a separate workspace where you can create new features, or work on fixing bugs, without altering your main project.
Developers often have strict rules about when changes to a project can be made directly onto the main branch. The main branch is typically reserved for production-ready code; main should always be ready to show to a client or stakeholder without fear of major bugs. This means that new features are developed on their branches, and then merged into the main branch.
When we create a new branch to work on a new feature, we call this checking out a branch. We checkout a branch by creating a copy of main - that way our new feature is built with our current functionality as its base.
Check out this visual representation of branching:
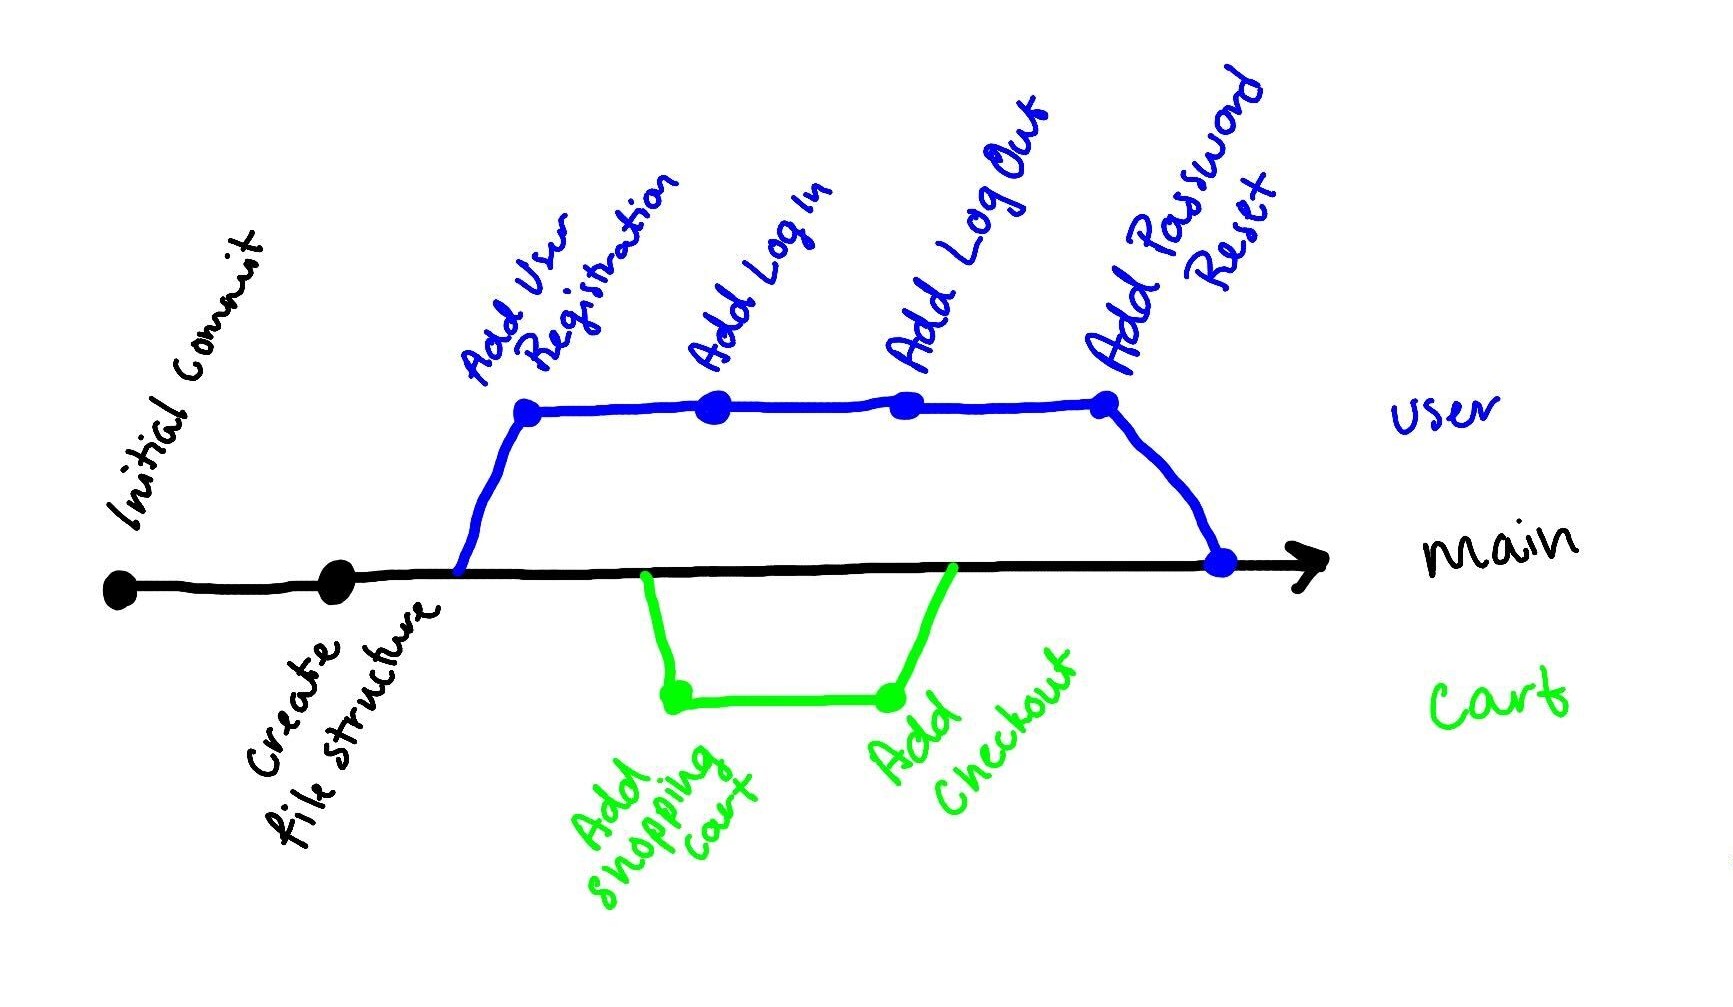
Here, we have a project that is created, then two branches are formed to work on different features (user and cart). Once each feature is complete, it is merged into the main branch. There may be many commits on each branch, and each of those commits will be represented in the commit history of the main branch when the feature branch is merged! In this example, when the branches are merged, the commits will line up like this:
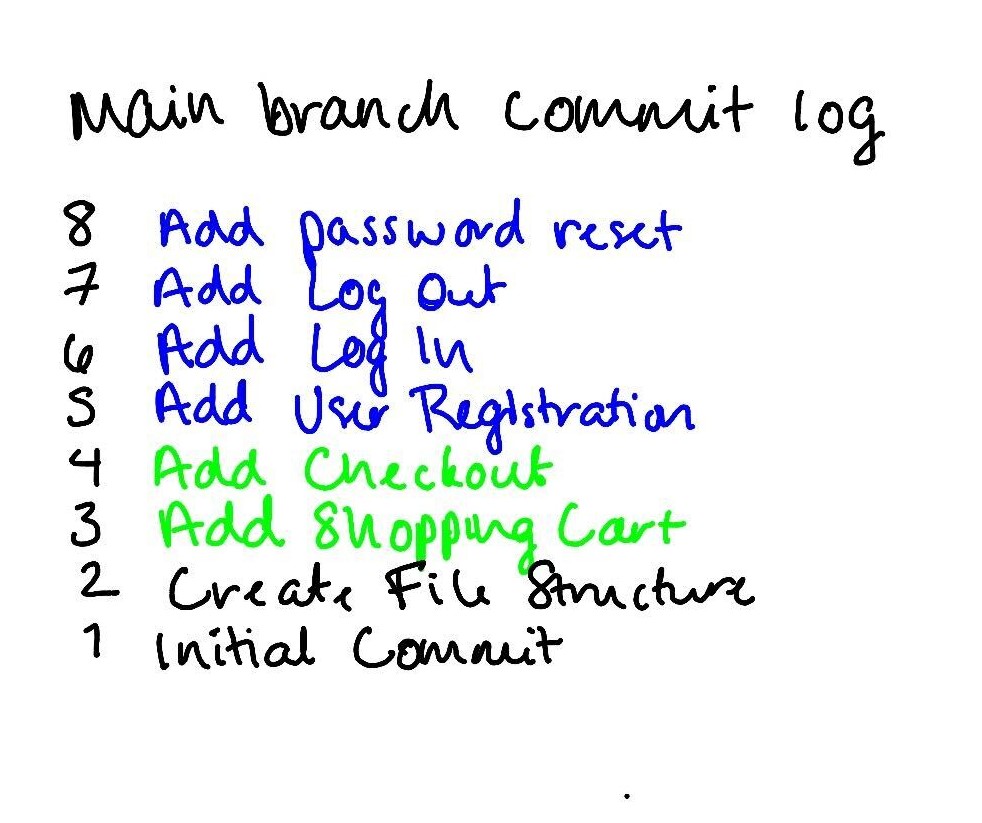
When we look at a commit log, we see the history of commits from newest to oldest - the most recent commit will be on top, and we can look backward by looking further down the list.
Individually, we are going to continue to practice working with git and branching by following along with the following 3 videos. As before, pause the videos as necessary, and complete all steps demonstrated. When finished, you will have created two branches, and merged those branches back to
main.
After you have completed the individual work above:
In small groups: discuss the process that you just completed. As a starter, answer the following questions:
- What is the purpose of branching?
- When we merge branches together, why might they not appear in chronological order in the commit history?
- What causes a merge conflict?
GitHub
With a partner, take a few minutes to discuss the following questions:
- Where does the project that you just created exist?
- If you lost your laptop tomorrow, would you still have access to this project?
- Can you think of some tools that you have used that allow you to access documents from different computers? Be ready to share out!
So far, we have created a project with a git repository that exists only on our local machines. This works fine for some personal projects, but it does have drawbacks:
- If you lose or damage your computer, your code is gone as well.
- It is difficult to share your code, and even more difficult to collaborate on projects.
When you share your code, you can get feedback and help a lot more easily. And, sharing your code allows for easier collaboration!
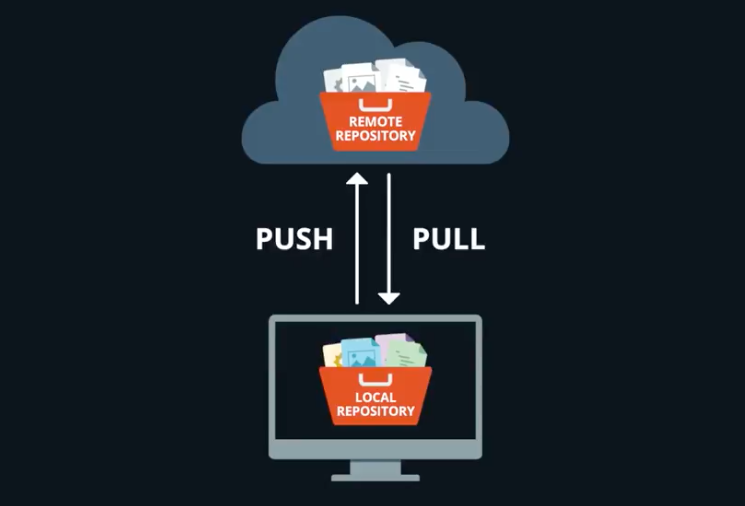
Github is where we will share our git repositories. You have used Github to fork and clone existing repositories - now let’s create a Github repository of your own. When this repository is created, you will have two versions of your project:
- A local repository that lives only on your computer
- A remote repository that lives in the cloud - it can be cloned by anyone on Github.
Individually, watch the video below to create a GitHub Repository for your Git Practice project.
Creating and Pushing to a Github Repository
After you have completed the individual work above:
In small groups: discuss the process that you just completed. As a starter, answer the following questions:
- When you pushed to Github, did all of your branches get pushed?
- Will you only push a project to Github once?
A Quick Note!
In this lesson, we have covered a lot - and we have only scratched the surface of Git and version control processes. As a developer you will continue to practice and improve these skills, so don’t be discouraged if your first few tries with git don’t go as planned! There are very few Git experts in the world, and it is not something you must master in order to be a great developer. But, you do need to practice git, and ask questions when you get stuck 🙂.
Check for Understanding
- In your own words, what is git? What is Github?
- Why do we use git and Github?
- Create a diagram that maps the branches and commits for the Git Practice project we created during the lesson.