Authorization
Learning Goals
- Understand the difference between user roles and user claims
- Implement role and claim level authorization using ASP.NET Core Identity
Roles and Claims
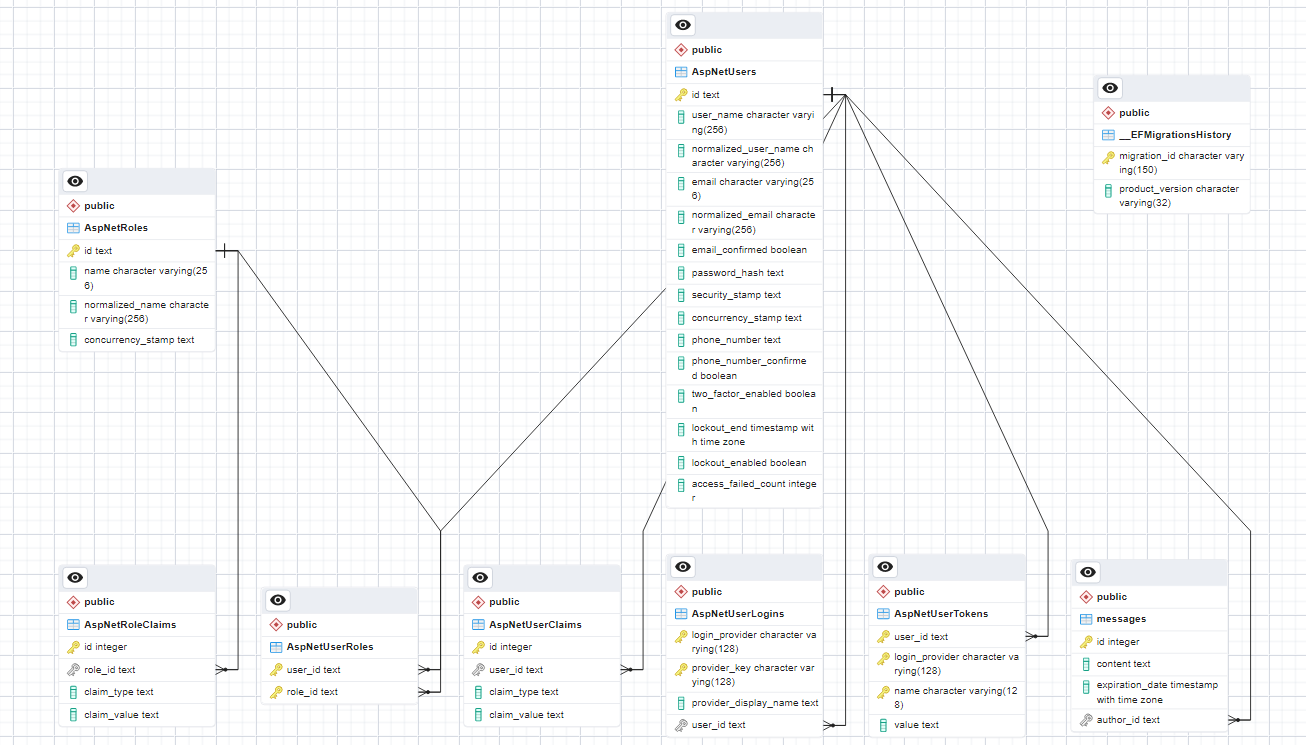
As we can see in the ERD of our IdentityMessageBoard application, our database is configured for roles and claims. Both can be used for authorization, but what is the difference?
Claims - A claim is a piece of information about a user. It represents attributes or characteristics of the user like their age, email, or other customer data. Claims are flexible because you can define custom claims that could change if the user’s characteristics change.
Roles - Roles are a way to group users based on common responsibilities within an application. Roles simplify authorization management by allowing you to define permissions and access control at a higher level. For example, you can create roles like “Admin,” “Editor,” or “User,” and then define what each role can or cannot do within the application.
So… both roles and claims help us control what a user can do. Seems pretty similar; let’s take a look at a real-world example to help clarify.
Suppose you’re building a web application for a library, and you have two types of users: regular users and librarians. Here’s how you might use claims and roles:
Claims In this example, you might have claims like “Age: 25”, “Subscription Type: Premium”, “Can Borrow Books: Yes”, “Can Reserve Books: No”, and so on.
- User 1 might have claims like “Age: 30” and “Subscription Type: Basic”.
- User 2 might have claims like “Age: 25” and “Subscription Type: Premium”.
With claims, you can make authorization decisions based on specific attributes. For instance, you can allow users with the claim “Can Borrow Books: Yes” to access the borrowing feature, and if a user has too many over-due books, you can set the value of that attribute to ‘claim’ a different level of access.
Roles Roles simplify access control by grouping users together and applying authorization rules to those groups. In this example, you can define two roles: “User” and “Librarian”.
- Users who are librarians are assigned the “Librarian” role.
- Regular users are assigned the “User” role.
With roles, you can control access at a broader level. For instance, you can grant all users with the “Librarian” role access to the administrative section of the library website, which allows them to manage book inventory and user accounts.
Roles Based Authorization with Identity
Setup
We will be building off of our IdentityMessageBoard from yesterday. If you need a new version, you can checkout the authentication-finished branch from the starter repository.
Registering Roles and Authorzition
In order to use roles to authorize users, we need to register Roles in our application services, and configure the app to use authorization:
using IdentityMessageBoard.DataAccess;
using Microsoft.EntityFrameworkCore;
using Microsoft.AspNetCore.Identity;
using IdentityMessageBoard.Models;

var builder = WebApplication.CreateBuilder(args);

// Add services to the container.
builder.Services.AddControllersWithViews();

builder.Services.AddDbContext<MessageBoardContext>(options =>
    options.UseNpgsql(builder.Configuration.GetConnectionString("IdentityMessageBoardDb")).UseSnakeCaseNamingConvention());

builder.Services.AddDefaultIdentity<ApplicationUser>(options =>
    options.SignIn.RequireConfirmedAccount = true)
        .AddRoles<IdentityRole>() // this is new!
        .AddEntityFrameworkStores<MessageBoardContext>();

var app = builder.Build();

// Configure the HTTP request pipeline.
if (!app.Environment.IsDevelopment())
{
    app.UseExceptionHandler("/Home/Error");
}
app.UseStaticFiles();

app.UseRouting();

app.UseAuthentication();
app.UseAuthorization(); // make sure you have this line

app.MapControllerRoute(
    name: "default",
    pattern: "{controller=Home}/{action=Index}/{id?}");

app.MapRazorPages();

app.Run();
And, if you can believe it… that’s pretty much all the setup! Now you are ready to start using Roles!
With a partner, add the following decorator to the AllMessages action:
        [Authorize(Roles = "Admin")]
        public IActionResult AllMessages()
            ...
Then:
- Try to access the All Messages link as a not logged in user
- Try to access the All Messages link as a logged in user
How are those experiences different?
Be ready to share out: how would you explain how the Authorize attribute controls user behavior?
Be sure students are thinking about the order of operations - in terms of auth, authentication is more important (gets checked first) than authorization.
Add Roles to Database and Existing Users
In order to see Role based authenticaion in action we need to:
- Create Roles
- Assign Roles to Users
In the past, we have created forms to add records to our database through a web application - why might we not want to do that for roles? At some point, a role will have to be assigned by a developer.
Think of an application like Amazon. If you are a merchant on Amazon, you must be registered with the company. Once registered, you may be able to create your own employee-users, but the initial setup will always be done by Amazon (or, a developer at Amazon). So, it will be common to manage Roles from the database - using SQL!
Add Admin Role to Database
Practice your SQL!
- Open pgAdmin and connect to the IdentityMessageBoard Database
- Insert a record into
AspNetRoles- name should be ‘Admin’
- Add the admin role to a user
- Hint: keep a close eye on your ERD! Make sure you are adding records to the correct table. If you are unsure, ask an instructor!
Before moving on, make sure that students have set things up correctly - ask for a chat waterfall of the SQL queries, if any look wonky, take the time now to debug!
SQL Query for assigning Admin to a user in the database (by id):
INSERT INTO "AspNetRoles" (id, name)
VALUES (1, 'Admin');

INSERT INTO "AspNetUserRoles" (user_id, role_id)
VALUES ('<a user id>', 1);
When you have configured an admin role and assigned it to a user, that user should be able to see the All Messages View!
The [Authorize] decorator can be used on an entire controller, or on a specific action. If you use it on an entire controller, you can exempt actions from authorization with the [AllowAnonymous] decorator!
Claims Based Authorization
Compared to Roles based authorization, claims are a bit trickier to manage. By definition, claims are things that describe a user (like age), that can change over time.
With a partner, take a look at the ERD for our current program. Answer the following:
- What information about claims is stored?
- How are claims related to users?
- What does this mean for how developers must manage claims in ASP.NET Core Identity?
Out of the box, claims are stored as key/value pairs associated with specific users. This could be ok for things like ‘birthdate’ where the key value pair could be "birthdate" : "01/13/1999". In this example, the age of a user will change, but the underlying data will not.
But consider a more complex example. What if we wanted to give users a different experience based on the number of times they interacted with our application. Maybe we want them to have sparkly font if they have visited the site more than 100 times. In that case, they key/value pair becomes more cumbersome - we would have to update that database record every time a user visits our page.
The more we are manipulating records, the more likely we are to have developer-errors impact our clients.
So, while there is funtionality included in the Identity Framework to handle Claim based authorization, it might not be the best.
In small groups, design a solution for the following scenario. You may use claims, roles, or any other strategy to accomplish this! You do not need to implement the solution just yet, but come up with some high-level structures for how you might achieve this goal.
The Scenario
We want to use claims to control an ‘easter egg’ for our application. When a user has exactly 7 messages created, they should get see a link in the nav-bar to a special page only for our “lucky 7” users.
✅When your group has a design planned, reach out to an instructor for approval.
Individually, implement the design your group came up with - use each other as resources!
Checks for Understanding
- Imagine you are talking to someone in Mod3 - they have just built their first MVC web application. How would you explain the differences between Authentication and Authorization?
- In your own words, what is a user claim?
- Could a user have multiple roles? Why or Why not?