Authentication
Learning Goals
- See an Example of hand-rolled Auth
- Implement the Asp.Net Core Identity Framework
An Example of Authentication and Authorization
Auth (the combo of Authentication and Authorization) is an integral part of most modern web applications; and you rarely see one without the other. Because this is such a common feature, there are many libraries that exist to take on most of the implementation of auth for us (yay!). But. These libraries are large, and offer a lot of functionality. Before we dive into an Auth library, lets take a look at an implementation of auth done without the use of any special libraries.
This will help us better understand what is happening under the hood of auth libraries that you will work with in the wild.
Follow the instructions in the Readme of this starter repo
Be ready to share out your discoveries!
For this discussion, we want to highlight which areas of the application are authentication, and which are authorization. For example, logging in a user is authentication, and making sure a user is an admin in order to see all users or all messages is authorization.
Authentication
We have talked around this idea a lot, authentication is the process of verifying that someone is who they say they are. This can happen in a variety of ways:
- Password Authentication: This is one of the most common forms of authentication, where a user provides a username and a secret password to prove their identity. The system then checks whether the provided password matches the stored password associated with that username.
- Biometric Authentication: Biometric authentication relies on unique physical or behavioral characteristics of an individual to verify their identity. Common biometric methods include fingerprint recognition, facial recognition, iris scanning, and voice recognition.
- Token-Based Authentication: Token-based authentication relies on the use of a unique token, which can be a physical hardware device (hardware token) or a software-based token (software token or one-time password generated by an app). A common implementation of token-based authentication is an app that asks for a users email or username, and sends a log-in link to the user’s email address. Tokens are typically time-sensitive and change regularly, adding an extra layer of security to the authentication process.
- And More! - There are other ways that users can be authenticated, but these are three of the more popular implementations.
Implementing Identity
Now that we have seen a ‘handrolled’ authentication solution, let’s take a look at using ASP.NET Core Identity
From the documentation linked above:
ASP.NET Core Identity:
- Is an API that supports user interface (UI) login functionality.
- Manages users, passwords, profile data, roles, claims, tokens, email confirmation, and more.
ASP.NET Core Identity is not the only way that we can implement authentication; we have seen previously that we can create our own authentication functionality. But, most modern web applications use some framework (like Identity) to help manage their authentication. So, it is important to have worked with one of these frameworks - this will give you an understanding of the possible complexities associated with authentication (and authorization).
Setup for Identity
We are going to start with a user-free MessageBoard and add authentication to it using ASP.NET Core Identity. Make sure you fork and clone the starter!
The completed code for this lesson can be found at the authentication-finished
Prep Context and Models
In order to use the Identity API, we need to configure our Database Context to build Identity related tables.
- Install the nuget package
Microsoft.AspNetCore.Identity.EntityFramework version 6.0.23 - In DataAccess/MessageBoardContext.cs update your inheritance to match this:
  using IdentityMessageBoard.Models;
  using Microsoft.AspNetCore.Identity.EntityFrameworkCore;
  using Microsoft.EntityFrameworkCore;

  namespace IdentityMessageBoard.DataAccess
  {
      public class MessageBoardContext : IdentityDbContext // this line needs to be updated!
      {
          public DbSet<Message> Messages { get; set; }

          public MessageBoardContext(DbContextOptions<MessageBoardContext> options) : base(options)
          {

          }
      }
  }
Add Custom User Properties
Out of the box, we get a User from ASP.NET Core Identity. In our database, we can see a table called AspNetUsers which holds records that are associated with a class called IdentityUser. This class is defined in the ASP.NET Core Identity package, so we don’t have easy access to update it to include information specific to our application.
So, we will use Inheritance to create a customer user class that we will reference throughout our application.
using Microsoft.AspNetCore.Identity;

namespace IdentityMessageBoard.Models
{
    public class ApplicationUser : IdentityUser
    {

    }
}
And, for our DbContext, we want to make sure that we are setting up our Identity User to be specifically the custom ApplicationUser we just created:
using IdentityMessageBoard.Models;
using Microsoft.AspNetCore.Identity.EntityFrameworkCore;
using Microsoft.EntityFrameworkCore;

namespace IdentityMessageBoard.DataAccess
{
    public class MessageBoardContext : IdentityDbContext<ApplicationUser>
    {
        public DbSet<Message> Messages { get; set; }

        public MessageBoardContext(DbContextOptions<MessageBoardContext> options) : base(options)
        {

        }
    }
}
Scaffold
- From the Solution Explorer, right-click on the project > Add > New Scaffolded Item
- From the left pane of the dialog, select Identity
- Click Add (this might take a moment or two)
- In the Add Identity dialog, select override all
- Choose your Database Context object
- Click Add (this will take a moment or two)
- Add the
_LoginPartialto your_layout.cshtmlfile:... <li class="nav-item"> <a class="nav-link text-dark" asp-area="" asp-controller="Messages" asp-action="AllMessages">All Messages</a> </li> </ul> <partial name="_LoginPartial" /> <-- this line is new! ... - Update your program.cs so that your application can use RazorPages:
  app.MapControllerRoute(
  name: "default",
  pattern: "{controller=Home}/{action=Index}/{id?}");

  app.MapRazorPages();
At this point, you have created all of the classes, views, and routing to manage user login/logout/registration. But, we have not yet updated our database!
- Create a new migration, and update your database
Now, you can check out your new ERD in pgAdmin, which should look something like this:
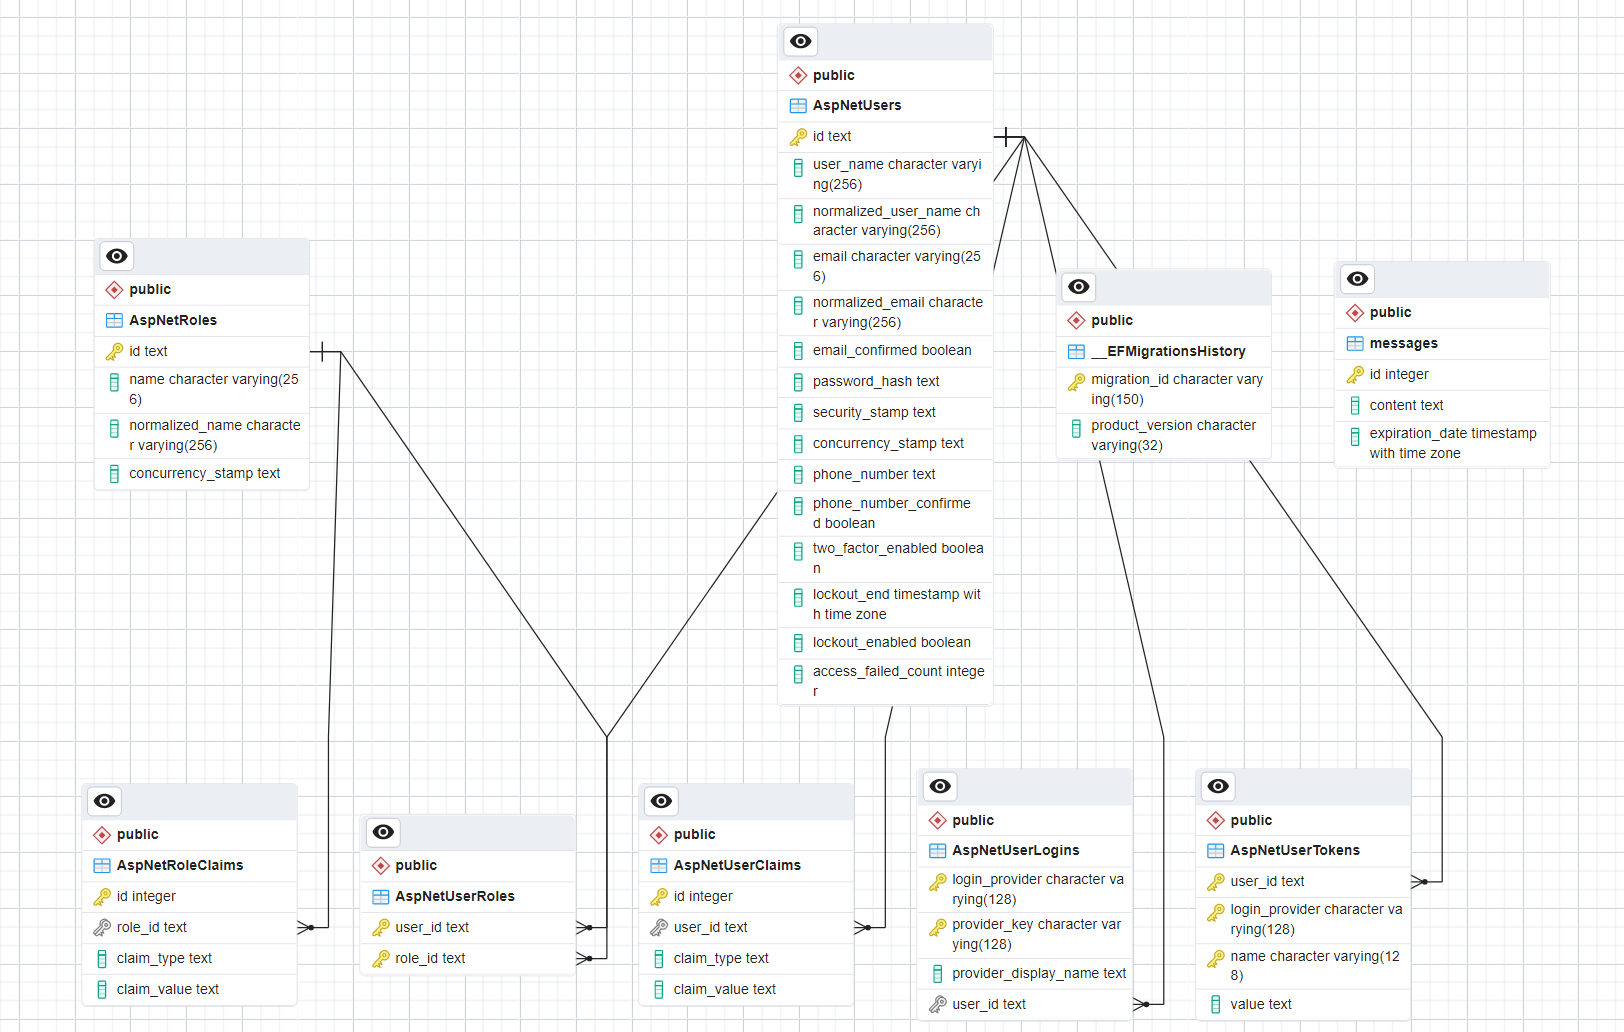
Database Relationships
With a partner, discuss:
- What relationship exists between a User and Messages?
- What other relationships can you label?
Experiment!
Now that we have some aspects of our application set up, play around with the following:
- Register a new user
- Add some messages
- Inspect the records created in pgAdmin
We are getting closer to our handrolled functionality, but we are still missing a few things.
With a partner, discuss the functionality that is missing. Be ready to share out!
Get Current User
For many functions that we want in our MessageBoard application, we will need access to the current user (the user who is currently logged in).
In the application, when a user is logged in, we can see their name in the upper right corner of the page. Explore the code to figure out how we can get information about a current user into a specific view.
Hint: Think about how we got the user’s email address into the nav-bar!
Spend at least 5 minutes playing around before checking out the answer below.
the User
If we take a look at our /Views/Shared/_LoginPartial, we can see that we are using a combination of SignInManager and UserManager objects from the Identity framework to manage our current user.
SignInManager is responsible for checking that there is someone signed in.
UserManager is responsible for providing data about a User. With the Identity framework, we have access to a User throughout the application. We can use that object, and the UserManager to get the information we need about a current user.
@using Microsoft.AspNetCore.Identity
@using IdentityMessageBoard.Models

@inject SignInManager<ApplicationUser> SignInManager
@inject UserManager<ApplicationUser> UserManager

<ul class="navbar-nav">
@if (SignInManager.IsSignedIn(User))
{
    <li class="nav-item">
        <a id="manage" class="nav-link text-dark" asp-area="Identity" asp-page="/Account/Manage/Index" title="Manage">Hello @UserManager.GetUserName(User)!</a>
    </li>
    <li class="nav-item">
        <form id="logoutForm" class="form-inline" asp-area="Identity" asp-page="/Account/Logout" asp-route-returnUrl="@Url.Action("Index", "Home", new { area = "" })">
            <button id="logout" type="submit" class="nav-link btn btn-link text-dark">Logout</button>
        </form>
    </li>
}
else
{
    <li class="nav-item">
        <a class="nav-link text-dark" id="register" asp-area="Identity" asp-page="/Account/Register">Register</a>
    </li>
    <li class="nav-item">
        <a class="nav-link text-dark" id="login" asp-area="Identity" asp-page="/Account/Login">Login</a>
    </li>
}
</ul>
With a Partner
Use what we have learned about accessing current user data to implement the following user story:
As a logged in user
When I create a new message
Then my email address shows up on the Messages index, next to that message.
Step One: Psuedo-code / plan the changes that you will need to make. Take about 10 minutes for this, and then we will come together to discuss. Step Two: Implement your plan!
This will require students to make database changes so that a user has messages and a message belongs to a user! Definitely check in on groups as they work and provide pointers.
Finally, Authorize
As of now, anyone (even not-logged in users) have access to the New Message form. Let’s use some controller action authorization to make sure that only logged in users can access that form!
Independent Research and Development
Use your good developer skills to research how to authorize specific controller actions in a .NET Core MVC application. When you find a solution, implement it into your project! Spend at least 5 minutes doing your own research before looking at the hint below.
Hint
There is a class and method attribute that can help here: [Authorize]
This is a bit nuanced, but the Authorize functionality depends on the implementation of Identity to confirm that a user is authorized. Right now, we are only authorizing based on a user being logged in. In our next lesson, we will learn more about authorizing different types of users!