Intro to ORM
So far, we’ve learned how to build console applications using C# and we’ve learned how to create databases using SQL. Today we get to put these two halves together and learn how to connect to a database from our applications!
Learning Goals
- Define ORM, Entity Framework, and Framework
- Describe the benefits of working with objects
- Use Entity Framework in a Console Application to create a database
- Create a one-to-many relationship using Entity Framework
Warmup
Today we’re going to be using a framework called Entity Framework. Let’s start by figuring out what a framework is.
In small groups Use google to research the answers to the following questions. Designate a spokes person to report back what you found!
- “What is a framework in programming?”
- “Why would we want to use a framework?”
One answer to these questions…
Codecademy has a great post about frameworks!
What is a framework?
“A framework is a structure that you can build software on. It serves as a foundation, so you’re not starting entirely from scratch. Frameworks are typically associated with a specific programming language and are suited to different types of tasks.
Let’s say you’re building a house. You could pour the foundation and frame the house yourself. It would take a lot of time, but you could do it. If all of that were already done for you, though, it would save you quite a bit of effort — especially if it was done by expert home builders.
In software development, a framework serves a similar purpose. It’s designed and tested by other Software Developers and Engineers, so you know it’s a solid foundation.” - Codecademy
Why would we want to use a framework?
“Using frameworks saves time and reduces the risk of errors. You don’t need to write everything from the ground up, so there’s less chance of introducing errors. Plus, frameworks have already been tested, so there’s less to worry about. Other advantages include:
- More secure code
- Simpler testing and debugging
- Avoiding duplicate code
- Clean and easily adaptable code
- Able to focus on writing code specific to the project Can be extended”
What is an ORM (Object Relational Mapping)
There are many types of frameworks we can utilize when building applications, one type of framework is an ORM (Object Relational Mapping).
What is an ORM? An ORM is a tool for creating a bridge between your database and the object oriented classes in your application. It allows you to interact with your database using the language of your choice (in our case C#) instead of SQL.
Why is this useful?
- We can connect to our database through our Console Application and using C# classes!
- It makes CRUD operations simpler. Instead of writing something like
SELECT id, name, email, phone_number FROM users WHERE id = 20you can write something likecontext.Users.Find(20) - The ORM can do a lot of work for us. We define the tables/columns/relationships in our classes and use the ORM to create the database tables. Once we learn this tool, it can help us be quicker developers and help catch our errors.
Introducing Entity Framework
Entity Framework is the most widely used Object Relational Mapping (ORM) for .NET.
It will allow us to build a connection between our C# Classes and our database tables.
The way we will build that connection is through a code first approach.
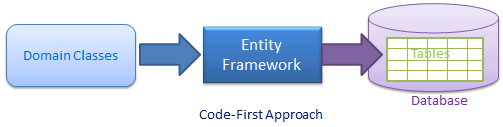
First we will write our classes (e.g. Book, Patron, Order), then we will use Entity Framework to create corresponding database tables.
You could use Entity Framework to go in the other direction and build classes from existing database tables. However, Entity Framework Core has limited support for this option because it’s far less common.
The Plan!
Goal: We want to build a plant tracking app. Our first goal is to build a Console application with a Plant Class. Then we will use Entity Framework to create a Plant table in a PlantTracker database.
- Create New Project
- Install Entity Framework
- Build our
PlantClass - Build our Context
- Create a Migration
- Apply our Migration to Create our Database
Let’s Build!
1. Create New Project
In Visual Studio Create a new project. Select the Console App template. Name your project PlantApp. Choose .NET 6.0 as the framework version. Click create!
2. Install Necessary Packages
In order to use Entity Framework Core to connect to postgreSQL we need to install the Npgsql.EntityFrameworkCore.PostgreSQL package.
To open up the package manager go to Tools -> NuGet Package Manager -> Manage NuGet Packages for Solution
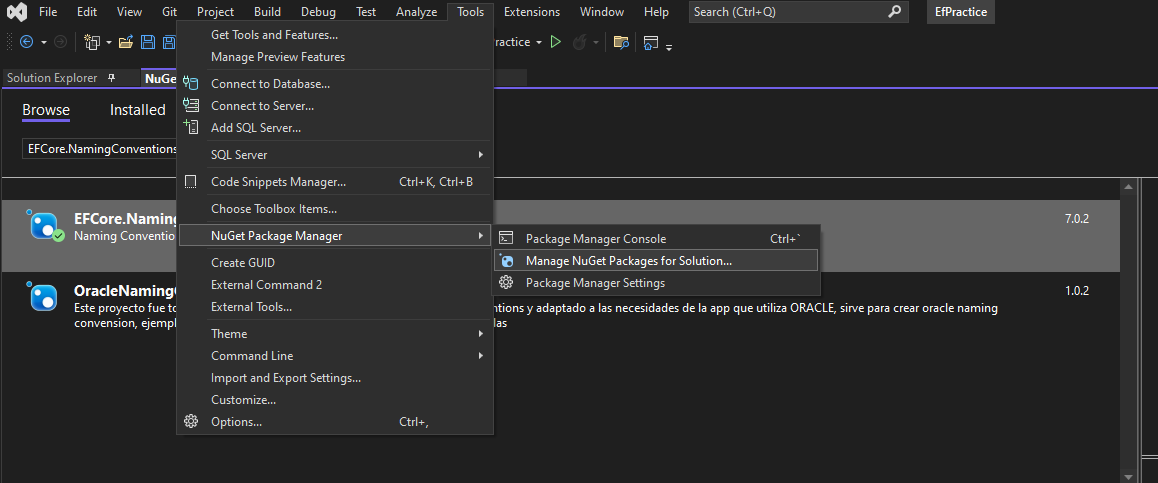
Then Browse for the Npgsql.EntityFrameworkCore.PostgreSQL package.
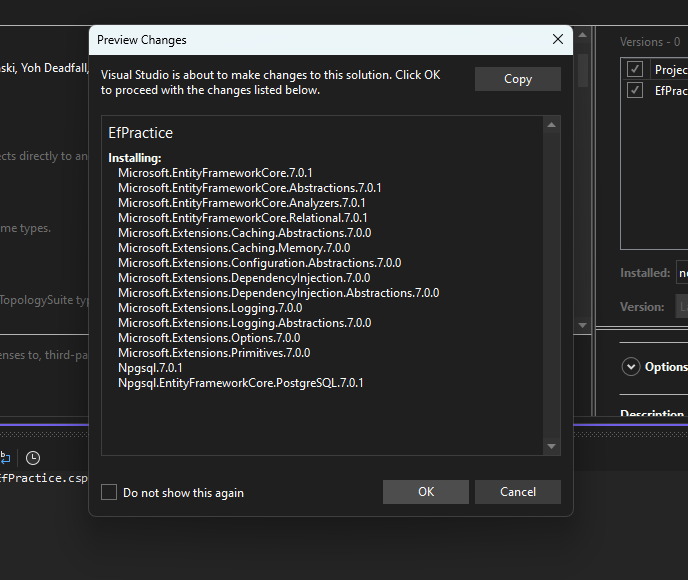
Once you click install, this first confirmation prompt should show up. This package uses all of the other packages listed, so those will be installed too.
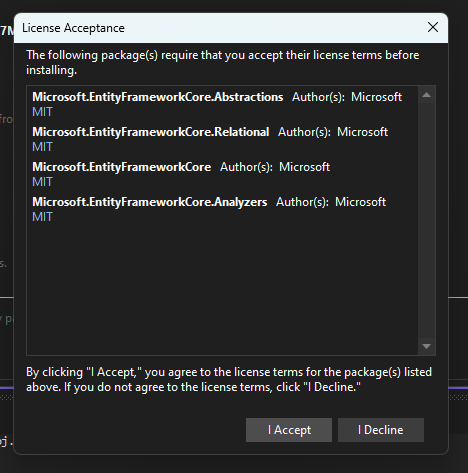
Then you’re asked to confirm the licenses used by the creators of this package.
3. Build our Entity Class
Create a new Plant class in your PlantApp project. Make sure your class is public and add the following fields.
namespace PlantApp
{
    public class Plant
    {
        public int Id { get; set; }
        public string Type { get; set; }
        public DateTime PurchaseDate { get; set; }
    }
}
Discuss with your partner: We haven’t had an Id field in our classes before, we might we need to add that here? You might find looking back at our goal helpful.
4. Create our Context
Add a new class to your PlantApp called PlantTrackerContext.cs.
using PlantApp;
using System;
using System.Collections.Generic;
using System.Linq;
using System.Text;
using System.Threading.Tasks;

namespace PlantApp
{
    public class PlantTrackerContext : DbContext
    {
        public DbSet<Plant> Plants { get; set; }

        protected override void OnConfiguring(DbContextOptionsBuilder optionsBuilder)
        {
            optionsBuilder.UseNpgsql("Host=localhost;Username=<postgress_user>;Password=<your_password_for_postgres_user>;Database=<database_name>");
        }
    }
}
Replace <postgress_user> with the Postgres user you want to connect with.
Replace <your_password_for_postgres_user> with the password for that Postgres user.
Replace <database_name> with the name of your database.
After replacing the values your code will look something like this.
using PlantApp;
using System;
using System.Collections.Generic;
using System.Linq;
using System.Text;
using System.Threading.Tasks;

namespace PlantApp
{
    public class PlantTrackerContext : DbContext
    {
        public DbSet<Plant> Plants { get; set; }

        protected override void OnConfiguring(DbContextOptionsBuilder optionsBuilder)
        {
            optionsBuilder.UseNpgsql("Host=localhost;Username=postgres;Password=password123;Database=PlantTracker");
        }
    }
}
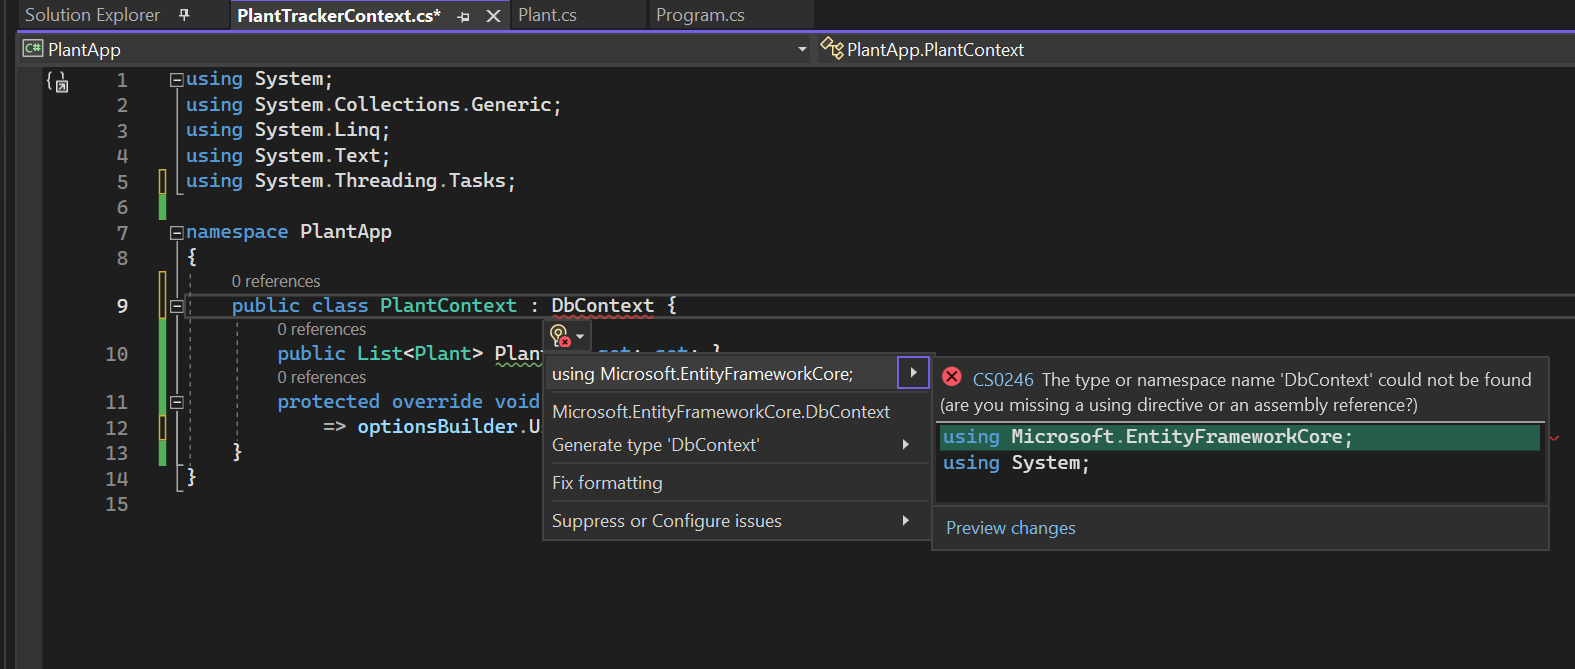
DbContext has a red underline because DbContext is part of Entity Framework that came along with the package we installed earlier. We just need to import it.
We’re almost done creating our context, just one small thing to add. In our postgrSQL database tables, we’ve been using snake case to name our columns. For example, purchase_date or last_name. We’re going to use an extension to tell Entity Framework to use this snake case naming convention when creating tables for us.
Install the EFCore.NamingConventions package and update your onConfiguring function.
protected override void OnConfiguring(DbContextOptionsBuilder optionsBuilder)
{
    optionsBuilder.UseNpgsql("Host=localhost;Username=postgres;Password=password123;Database=PlantTracker")
    .UseSnakeCaseNamingConvention();
}
5. Create a Migration
We need one more package to allow us to create a migration. Install the Microsoft.EntityFrameworkCore.Tools package.
Open the Package Manager Console and type the following command.
Tools > NuGet Package Manager > Package Manager Console
add-migration CreatePlantTrackerDb
add-migration is the command and “CreatePlantTrackerDb” is a description of what changed. It’s similar to a commit message when using git.
Open up your Solution Explorer. You should now have a migrations folder, take a look at what’s there!
What’s created is not very human-readable, but we can get a rough understanding of what’s happening. We can see there is something about creating a table with the name plants.
You can think of your migration file as instructions for what SQL should be run on your database.
6. Apply the Migration to Create our Database
To actually execute the instructions in our migration file, or in technical terms “apply the migration”, we run the following command in the Package Manager Console.
Tools > NuGet Package Manager > Package Manager Console
update-database
❓ How can we check if this worked ❓
With your group: Take a look in PG Admin and try to answer the following questions.
- What database was created? What code specified that name?
- What table with created? What code specified that name?
- What columns were created and what data type are they? What code specified the column names and data types?
One-to-Many Relationship
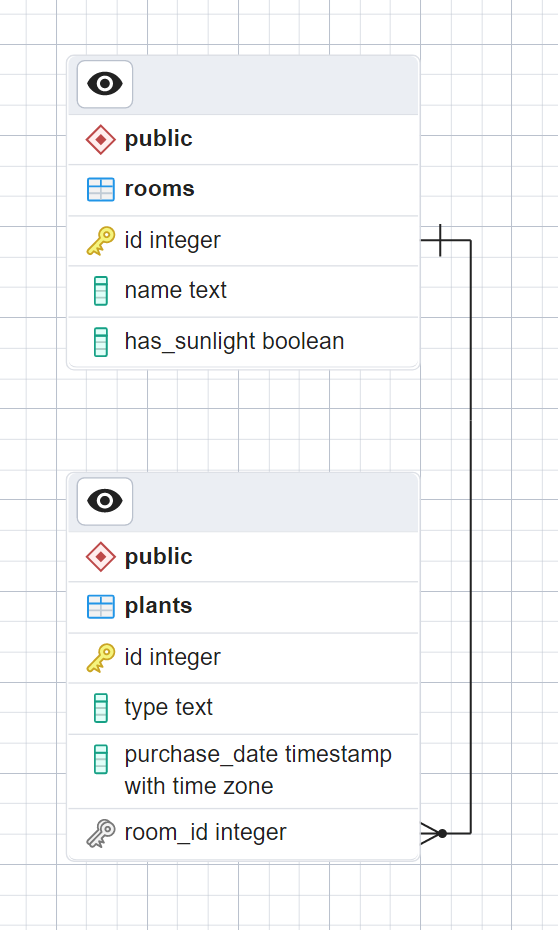
Let’s add a new entity to our database. We also want to keep track of the rooms in our house. We want to also add a one-to-many relationship between rooms and plants. Each plant belongs to one room, and each room can have many plants.
Here’s the plan
- Build our
RoomClass. Modify Plant Class to create a one-to-many relationship. - Add
Roomto our Context - Create a Migration
- Apply our Migration to update our database
1. Build our Room Class. Modify Plant Class to create a one-to-many relationship.
Create a Room class.
namespace PlantApp
{
    public class Room
    {
        public int Id { get; set; }
        public string Name { get; set; }
        public bool HasSunlight { get; set; }
        public List<Plant> Plants { get; set; }
    }
}
Update the Plant class.
namespace PlantApp
{
    public class Plant
    {
        public int Id { get; set; }
        public string Type { get; set; }
        public DateTime PurchaseDate { get; set; }
        public Room Room { get; set; }
    }
}
2. Add Room to our Context
namespace PlantApp
{
    public class PlantTrackerContext : DbContext
    {
        public DbSet<Plant> Plants { get; set; }
        public DbSet<Room> Rooms { get; set; }

        protected override void OnConfiguring(DbContextOptionsBuilder optionsBuilder) => optionsBuilder.UseNpgsql("Host=localhost;Username=postgres;Password=password123;Database=PlantTracker").UseSnakeCaseNamingConvention();
    }
}
3. Create a Migration
Open the Package Manager Console and type the following command.
add-migration AddRoomTable
4. Apply our Migration to update our database
Open the Package Manager Console and type the following command.
update-database
Let’s take a look in PGAdmin at what entity framework created for us!
Why an ORM is so helpful!
We’ve already seen some of the benefits of an ORM in action!
Instead of having to write SQL to build our database and tables, we used our ORM to build the tables based on our classes and their relationships.
Tomorrow we’ll learn how we can also use the power of an ORM to easily perform CRUD operations on our database (e.g. Add plants, select specific plants, modify plants, delete plants) in our console application!
We’ll also learn how to run more advanced queries on the data in our database using LINQ syntax.
Checks for Understanding
We covered a lot of new concepts today! We’ll keep practicing with Entity Framework over the next couple of weeks, so it’s expected that these terms are still confusing, just give these definitions your best shot!
- In your own words, define the following terms.
- Framework
- ORM
- Entity Framework
- Context
- A Migration
- Applying a Migration
- What are the three packages we needed to install to set up our ORM?