Intro to Testing
Learning Goals
- Define Automated Testing.
- Understand why we use tests.
- Implement unit tests for a single class.
Warm Up
In small groups, discuss your reflections to yesterday’s Lab preparation questions. Be ready to share out!
Automated Testing
Up to this point, the way that we have been verifying that our code works would be referred to as manual testing. We have been confirming functionality by running the programs themselves - either after completing our code, or along the way. While this approach can help us determine the functionality of our code, it also poses some problems:
- Manual testing takes a lot of human time - time that may be better spent doing other things.
- Manual testing is more reactive than proactive - we test our code only after it has been written (more on this in a our Unit Testing II Lesson).
The good news: there is a better way to test! We can use automated testing to confirm the functionality of our code. An automated test is a separate project that a developer creates alongside their implementation code. This test project:
- relies on the implementation code that is being written, and
- provides feedback to the developer based on the expected behavior
Like many things in programming, there are a lot of ways to write tests. We are going to use xUnit to test our projects in Mod1.
Testing with XUnit
xUnit is a framework that we can use to create test projects for our code. A framework is some pre-built functionality that we can include in our projects to help with specific tasks (like testing!).
The standard file structure for testing our solutions is to have one test project for each solution project. Within each test project, we will have one test file for each class in that project. Take a look at a sample file structure below:
Solution
|--ProjectName
   |--SomeClass.cs
|--ProjectName.UnitTests
   |--SomeClassTests.cs
Creat a Project to Test
We are going to be creating a starter project in order to build some tests. Follow the steps below to get started:
- Create a new Console Application in Visual Studio
- Call your project
IntroToTesting - Create a new class called
User
using System;
using System.Collections.Generic;

namespace IntroToTesting
{
    public class User
    {
        public string Name { get; private set; }
        public string Username { get; set; }
        public List<String> Tweets { get; } = new List<String>();

        public User(string name)
        {
            Name = name;
        }

        public void Tweet(string message)
        {
            Tweets.Add(message);
        }

        public string MostRecentTweet()
        {
            var lastIndex = Tweets.Count - 1;
            return Tweets[lastIndex];
        }
    }
}
Creating the Test Project
The first thing we need to do is create our XUnit Text Project.
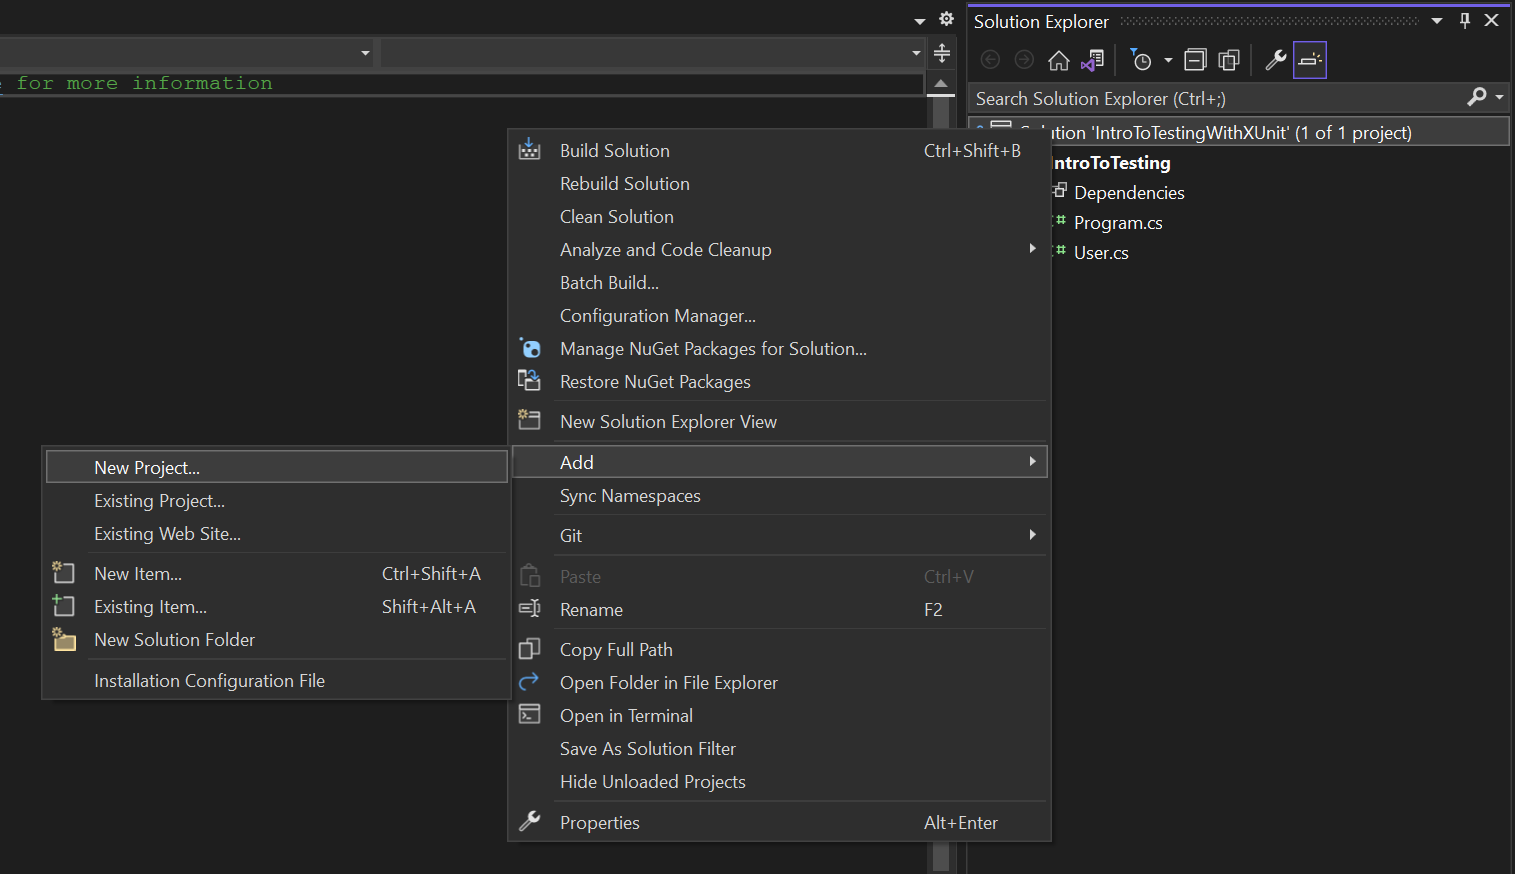
In the Solution Explorer, right-click on the solution name Solution 'IntroToTestingWithXUnit' and select Add > New Project.
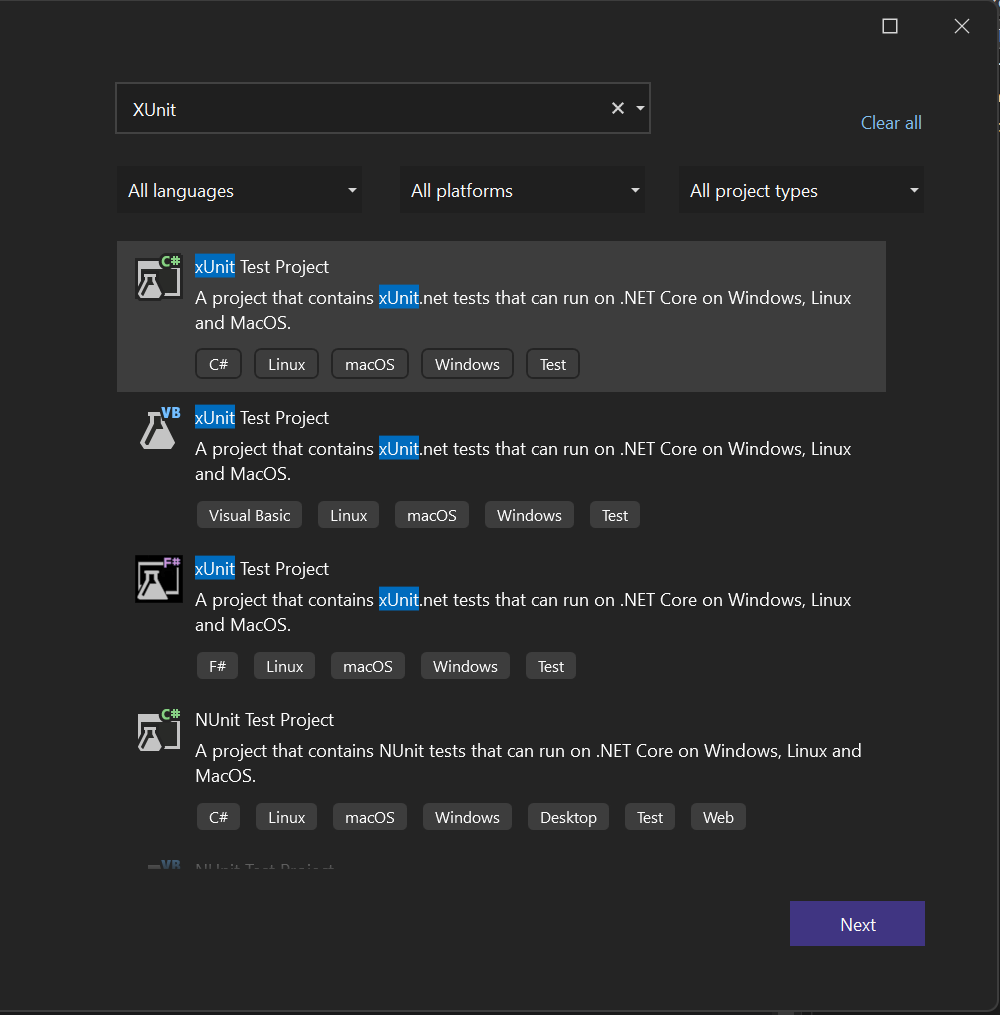
Search for xUnit and select the c# xUnit Test Project, then click Next.
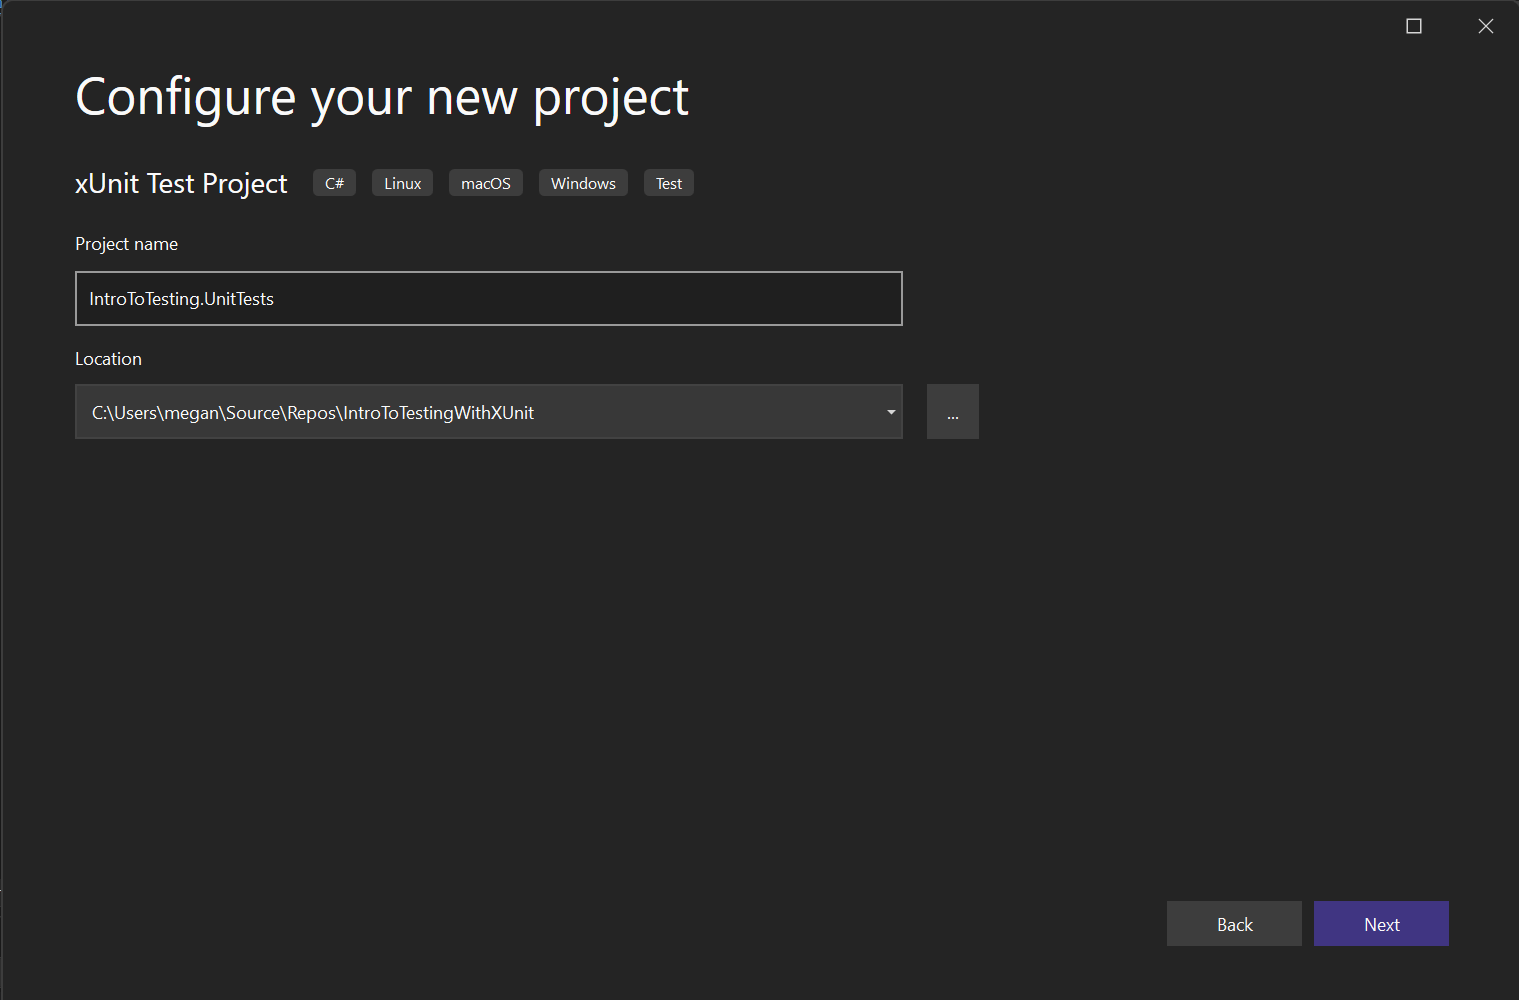
Name your project IntroToTesting.UnitTests. Click Next and then Create.
We have now created a new project that is a Console Application with a few differences. One of the biggest differences between these two projects is the presence of a Program.cs file in IntroToTesting, and a lack of that file in IntroToTesting.UnitTests.
With a partner, discuss the purpose of the file Program.cs; how have we used this file in the past? Why do you think we don’t have that file in the test project? Be ready to share out some ideas!
Similar to how we use Program.cs to execute the code that makes up our program, we will now use our IntroToTesting.UnitTests project to execute each piece of code that we write, in order to see if the code is functioning as we expect.
Writing Our First Test
Before we write our first test, we need to determine what we should test. You want to make sure that you are testing all of the ways that we could interact with an object (in this case, an instance of User). That includes:
- methods that exist for a class
- properties that exist for a class
In our starter project, we have an existing class - User. Take a moment to review that class in Visual Studio, or below. In your notebook, list all of the methods that exist in the User class.
    public class User
    {
        public string Name { get; private set; }
        public string Username { get; set; }
        public List<String> Tweets { get; } = new List<String>();

        public User(string name)
        {
            Name = name;
        }

        public void Tweet(string message)
        {
            Tweets.Add(message);
        }

        public string MostRecentTweet()
        {
            var lastIndex = Tweets.Count - 1;
            return Tweets[lastIndex];
        }
    }
Because we want to make sure we test all the methods we have written, we will need to test:
- Tweet()
- MostRecentTweet()
And, we will want to test that we can access the properties that we want available on a User:
- Name
- Username
- Tweets
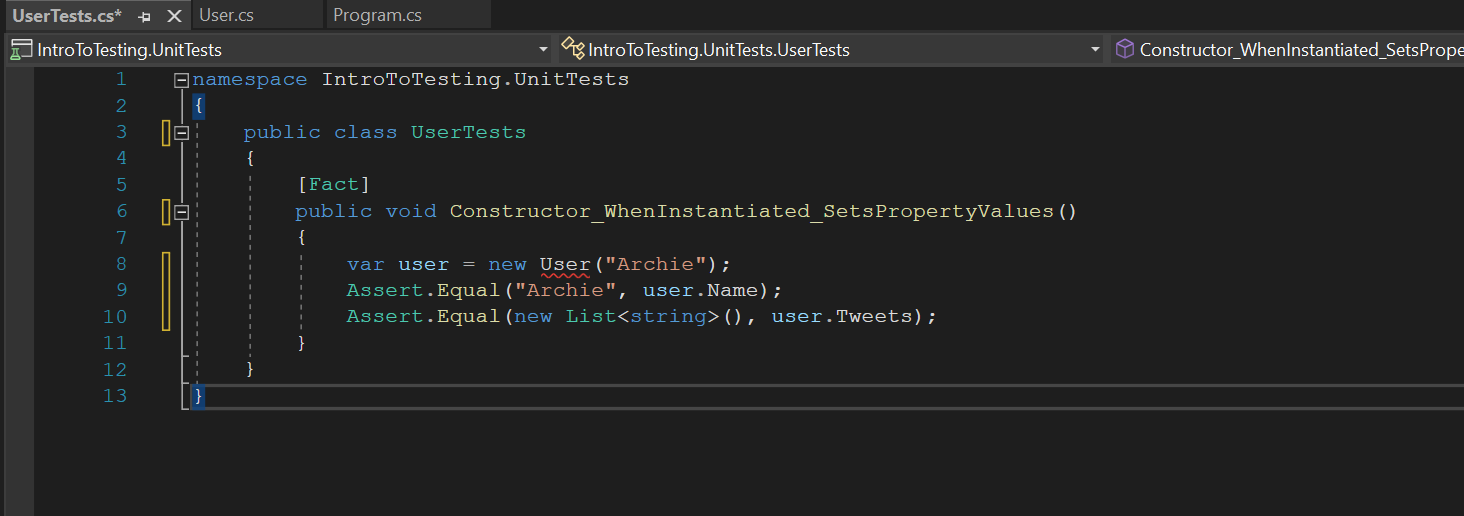
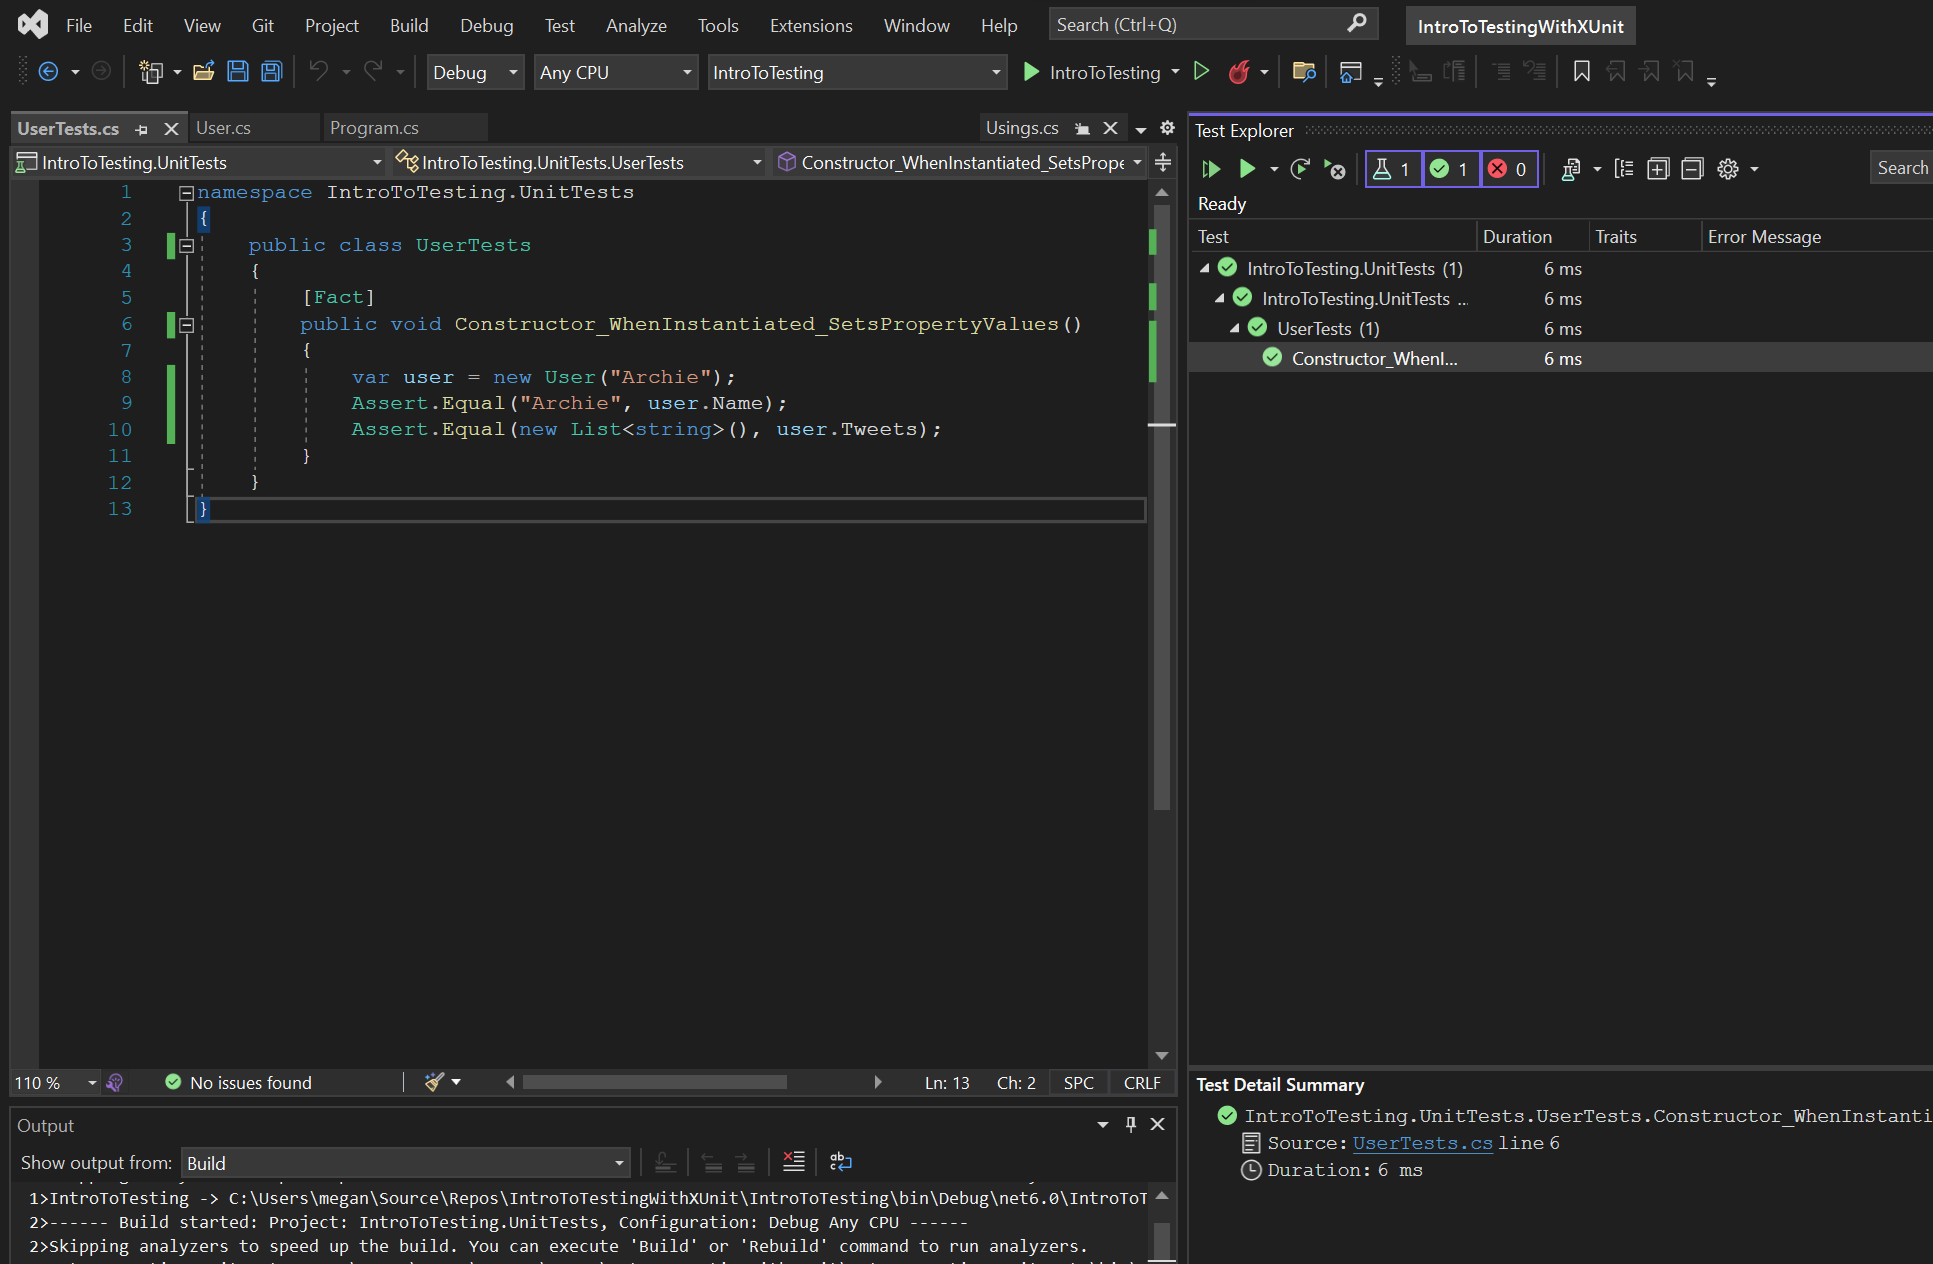
Let’s start by testing the Properties. In your IntroToTesting.UnitTest > UnitTest1.cs file, update the first test so that your file looks like this:
Adding a Project Reference
You may notice that right away we are getting some negative feedback from Visual Studio regarding the User object. It seems as though it doesn’t exist, but we know that it does! Take a moment to think about why this test class doesn’t know about the User class.
In any solution, we might have one or more projects; and within those projects, we will have one or more classes. You can think of each project as a container for classes. In order for projects to have access to classes in other projects, we need to add a reference so that we can use classes from a specific project. In this case, we need to add a reference to our IntroToTesting.UnitTests project that points to our IntroToTesting project.
To add the reference, right click on the project Name, and select Add > Project Reference.
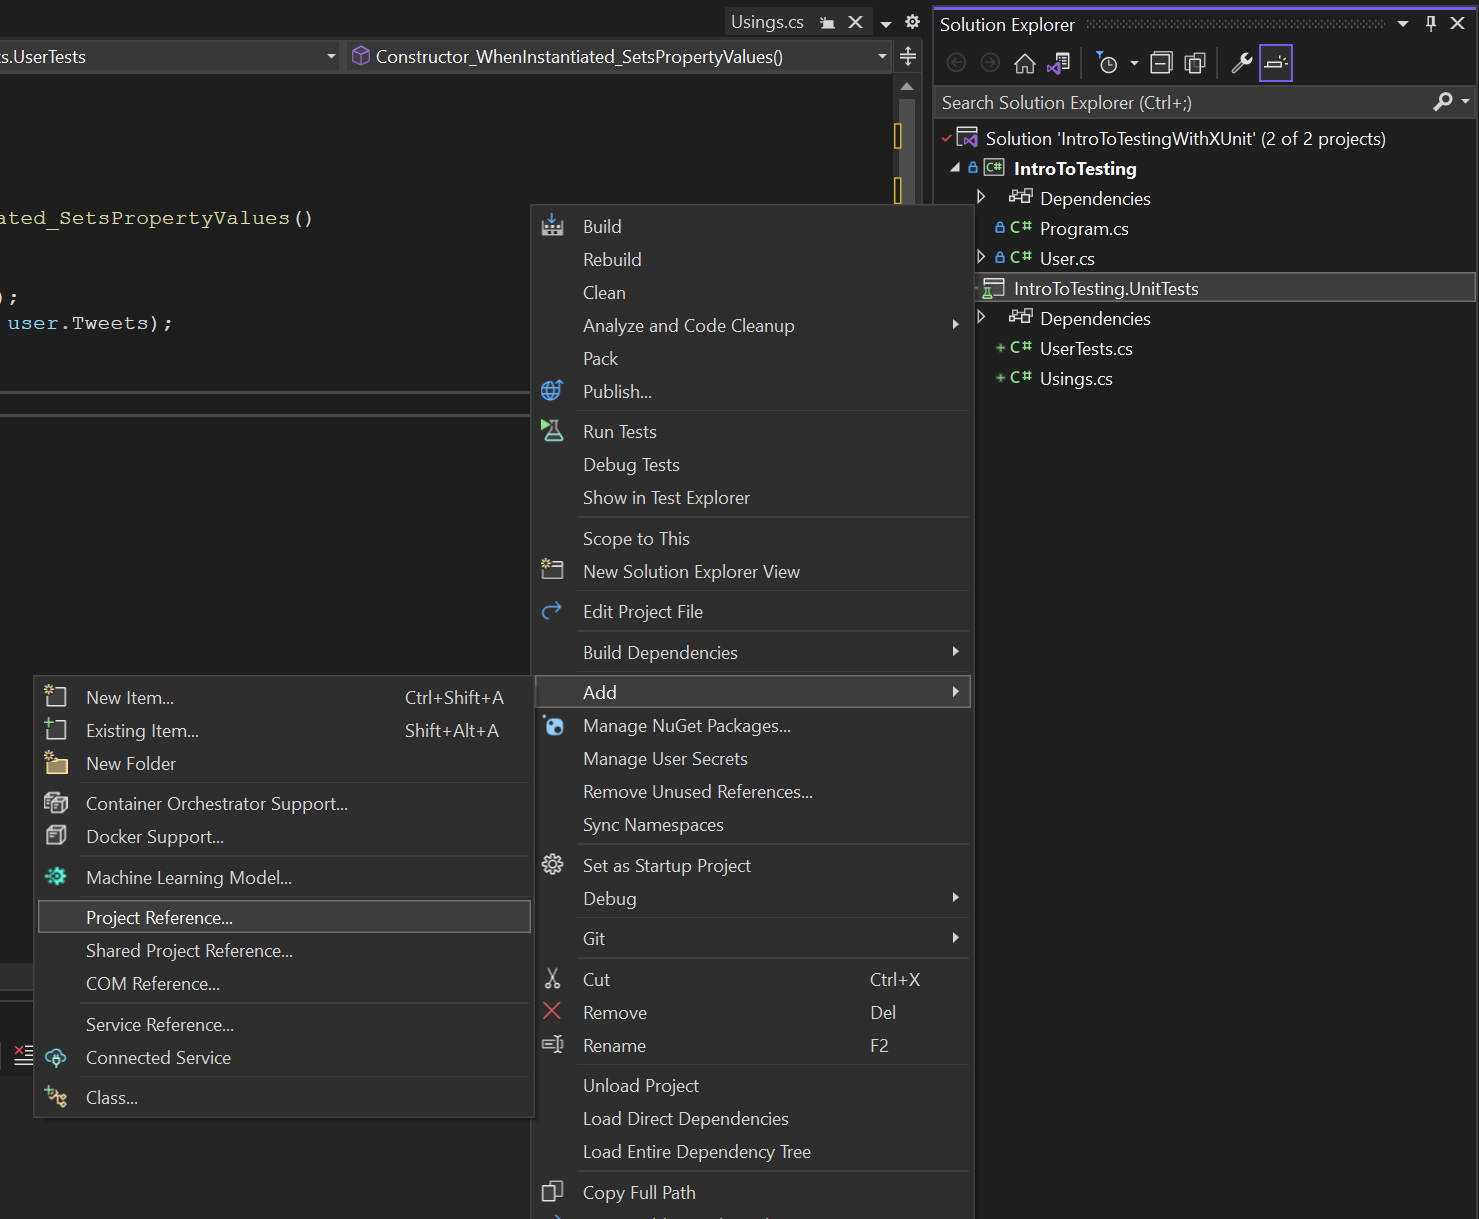
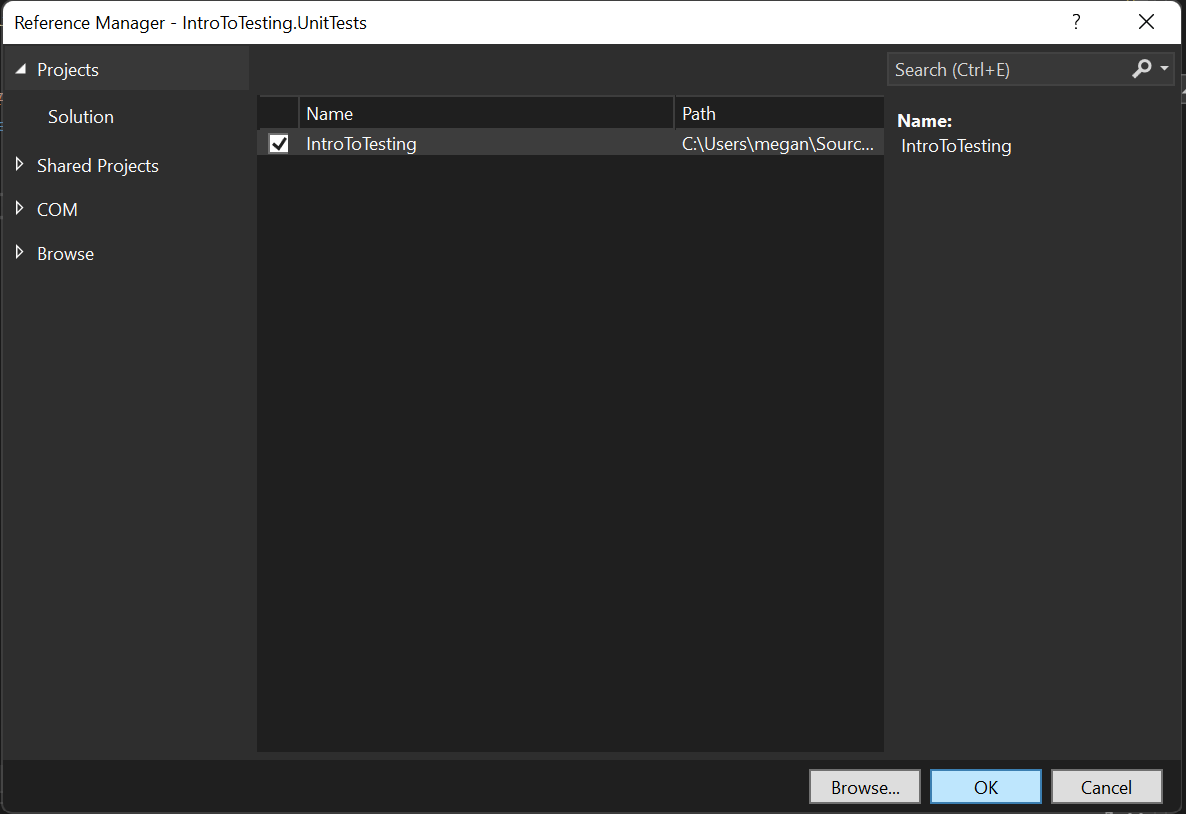
Then, mark the box for IntroToTesting and click ‘OK’
Once this reference is added, you should see the red squiggles under User disappear - our Test project now knows about any * public * class that exists in the IntroToTesting project.
Test Syntax
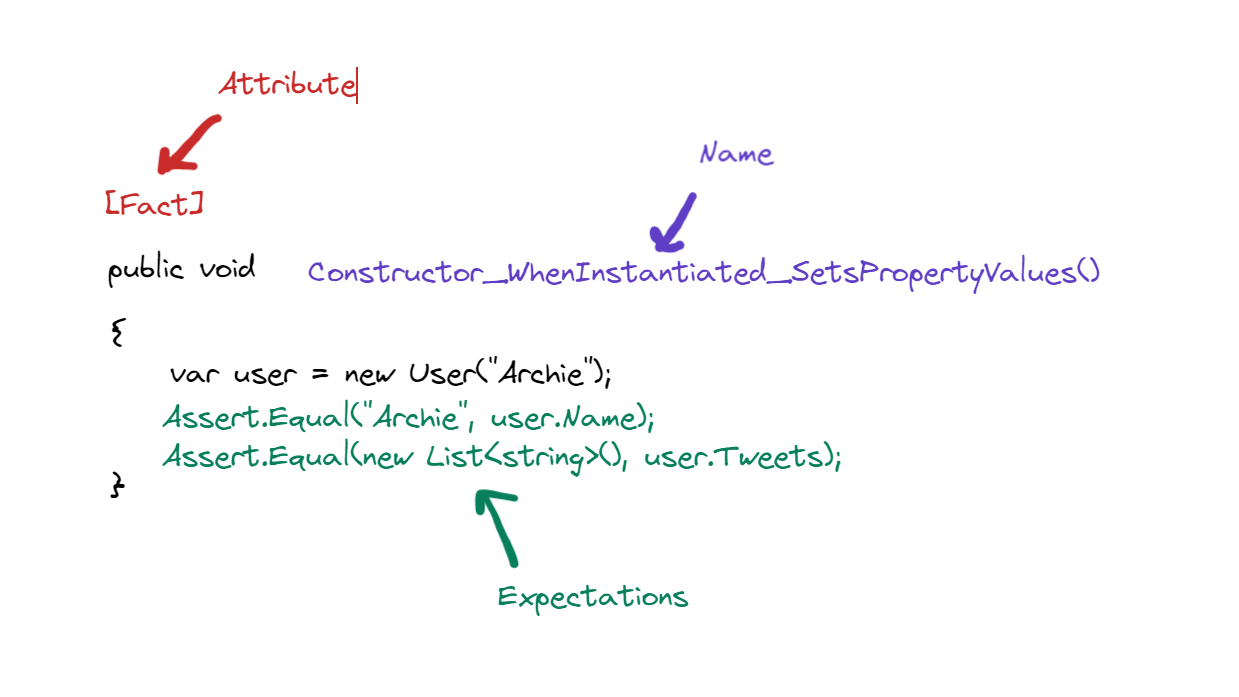
The test that we have has a few key pieces that are common to all tests:
- [Fact] attribute
- Test Name
- Expectations
The attribute [Fact] tells xUnit that the following method is a test that should be executed when the project is run. We will learn more about method attributes later; for now, you just need to know that every test needs this attribute.
The Test Name can be anything that describes the behavior that test is meant to confirm. In this case, we are testing that the class constructor sets up some property values when the user is created; so we’ve tried to name the test in a way that conveys that to other developers.
The expectations describe how we want an object to behave. In this case, immediately after the user is created on line 8, we want user.Name to be "Archie", and user.Tweets to be an empty list of strings. We are using some objects and methods that we get from xUnit to confirm this (Assert, and .Equal()).
Running Our Test
Now that we have a test written, we can run it by selecting Test > Run All Tests.
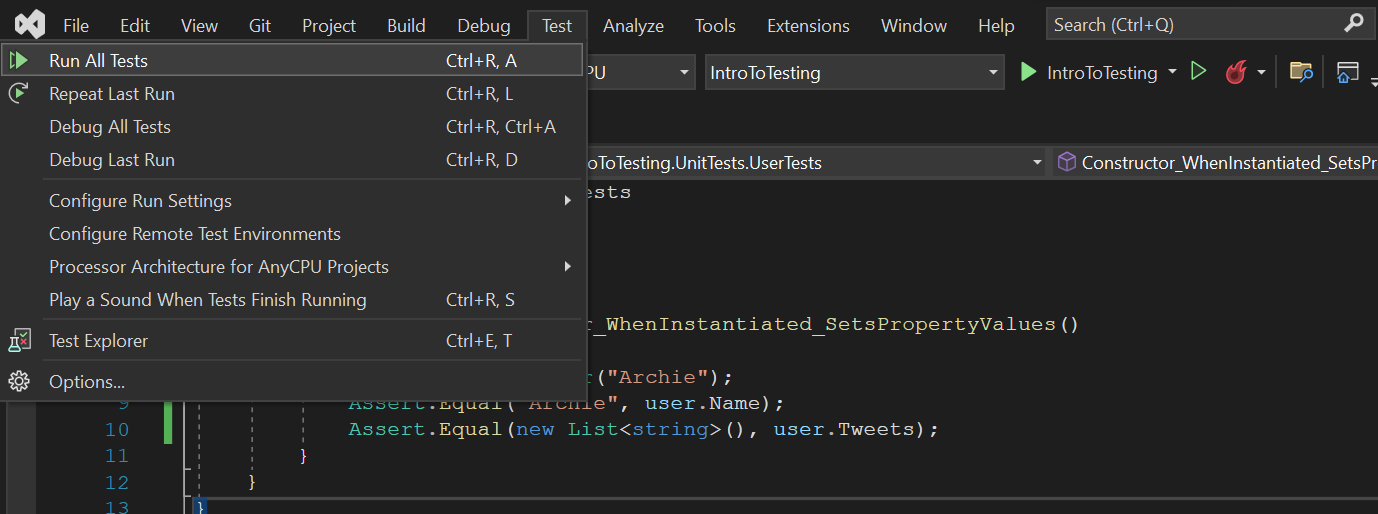
This will open the Test Explorer in either a new window, or in the same pane as your solution explorer. You should see a cascade of green checks indicating that your test has passed!
If your test didn’t pass, you would see a red indicator, and some information as to why the test did not pass. Let’s update our test to force a failure, just to see what that looks like.
On line 9 of your test, change the expected name to be "ARCHIE", then run your tests again. You should see something like:
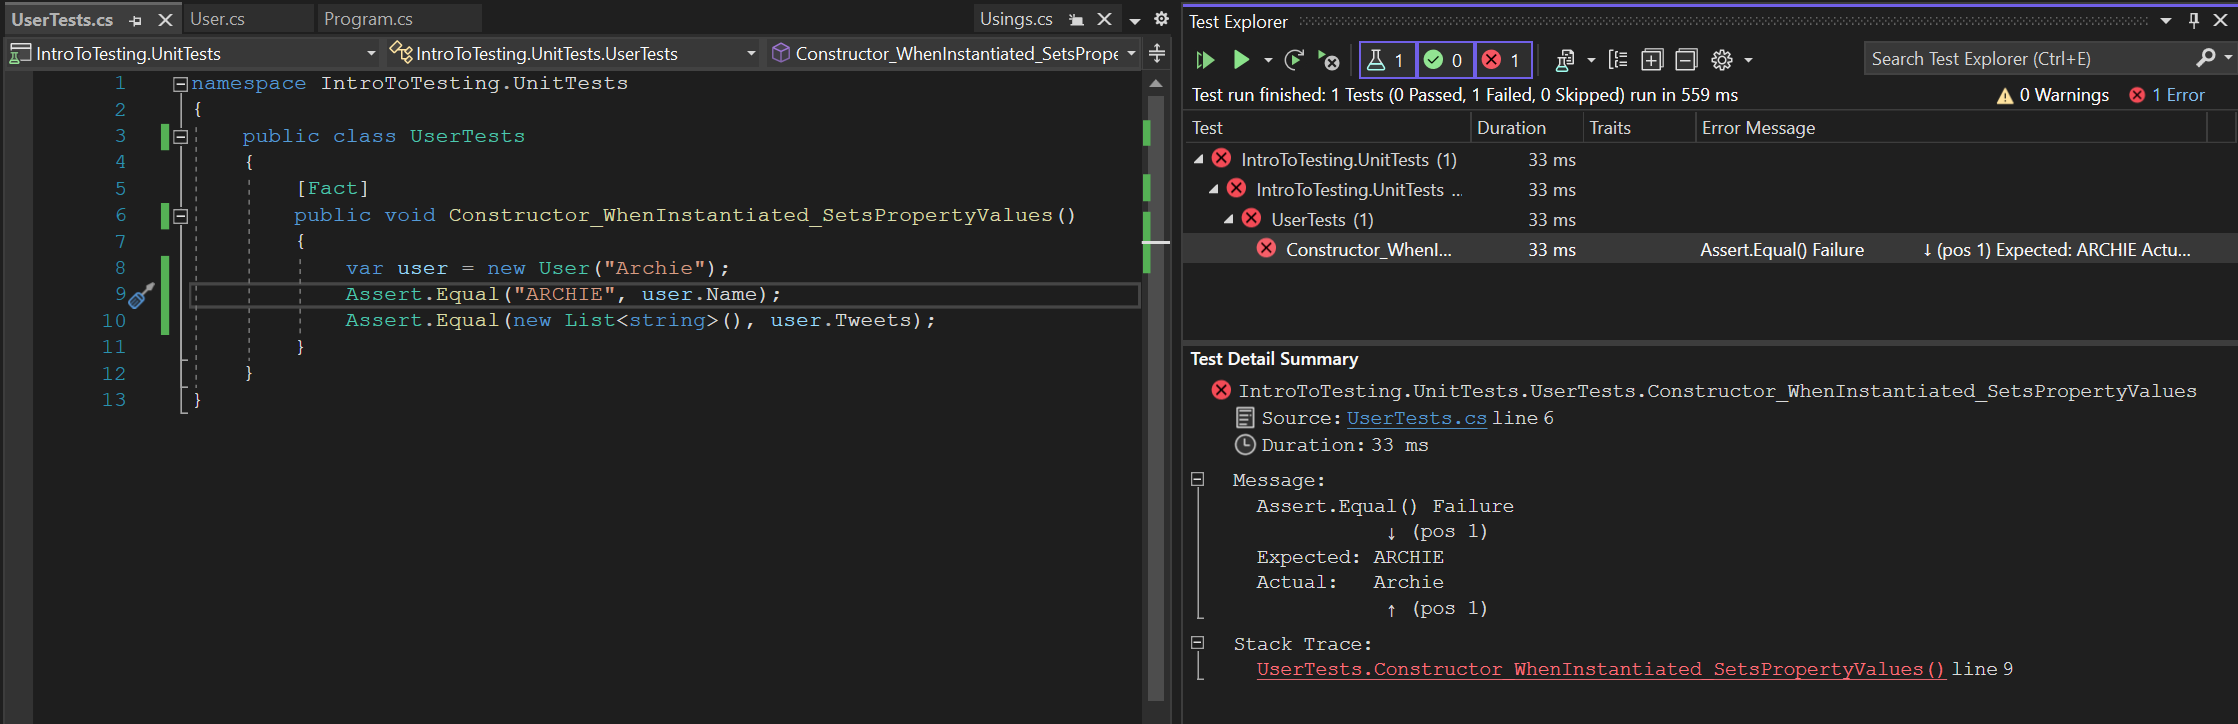
Now, we can see that our test did not pass because what we expected ("ARCHIE") was not what we actually got ("Archie"). This failure means that our User class is syntactically correct (our program didn’t crash), but is not behaving as expected.
Let’s revert this test back to the passing version, and write some more tests!
Writing additional tests
We’ve tested that our user gets created with a Name, and an empty List of Tweets. Now, let’s confirm that we can set and retrieve their Username.
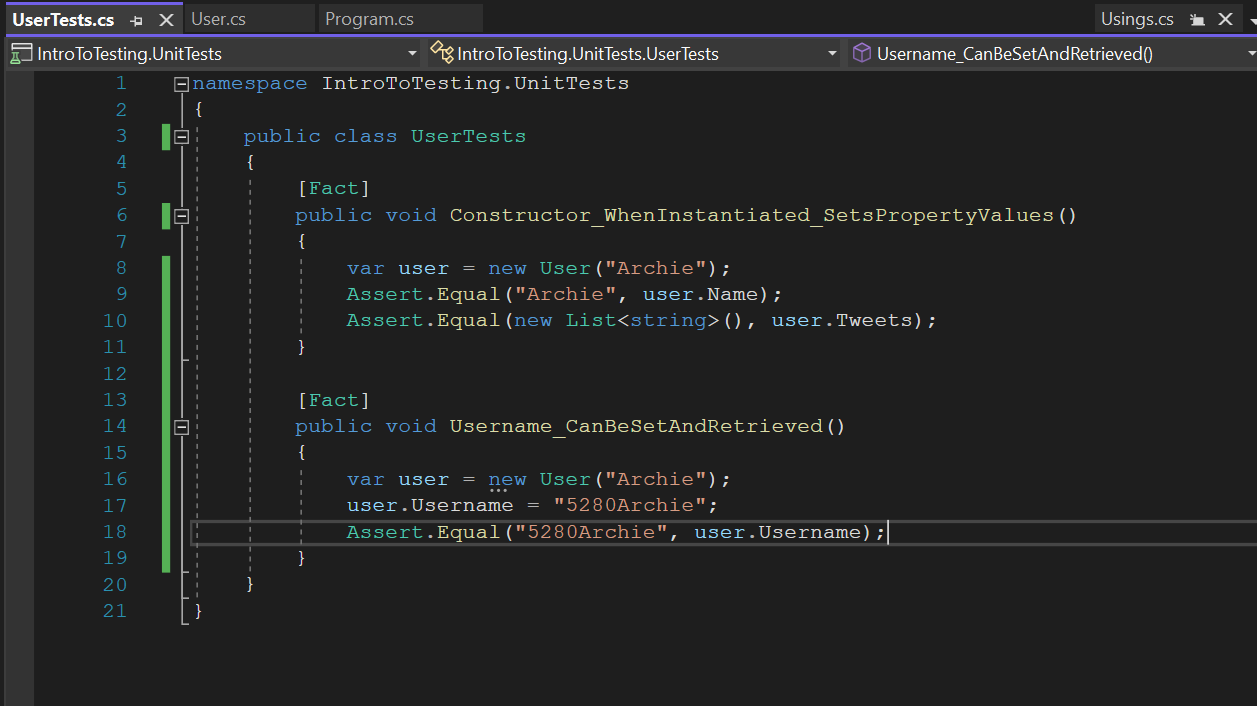
We can see that the structure of this test is just a bit different that our first test. In addition to creating a user and making assertions, we are also executing some code (on line 17). Frequently, we will need to do some execution of code in our tests to confirm that a particular behavior is working properly. In this case, in order to verify that our User can be given a username, we have to actually execute that code - if the User class was not set up correctly, our tests will fail.
With a partner, write two more tests that verify the methods Tweet() and MostRecentTweet().
Check for Understanding
- What is automated testing? How does it differ from manual testing?
- The test below is missing something… what is it missing? Why is the missing piece necessary?
public class MathTest { public void OnePlusOneIsTwo() { var sum = 1 + 1; Assert.Equal(2, sum); } } - Imagine that our User class has the following method; in your notebook, write a test that would confirm that this method is working.
public int TweetCount()
{
  return Tweets.Count;
}